- The theme zip file javier.zip
- Child theme for easier customize in javier-child.zip
- Document in Documentation
Struct look like:

Thank you for purchasing our theme. If you have any questions that are beyond the scope of this documentation, please feel free create topic on my help desk. Thanks so much!
To use JAVIER, you must be running WordPress 4.4 or higher, PHP5.6 or higher, and MySQL 5 or higher. We have tested it with Mac, Windows and Linux. Below is a list of items you should ensure your host can comply with.
Many issues that you may run into such as: white screen, demo content fails when importing, empty page content and other similar issues are all related to low PHP configuration limits. The solution is to increase the PHP limits. You can do this on your own, or contact your web host and ask them to increase those limits to a minimum as follows:
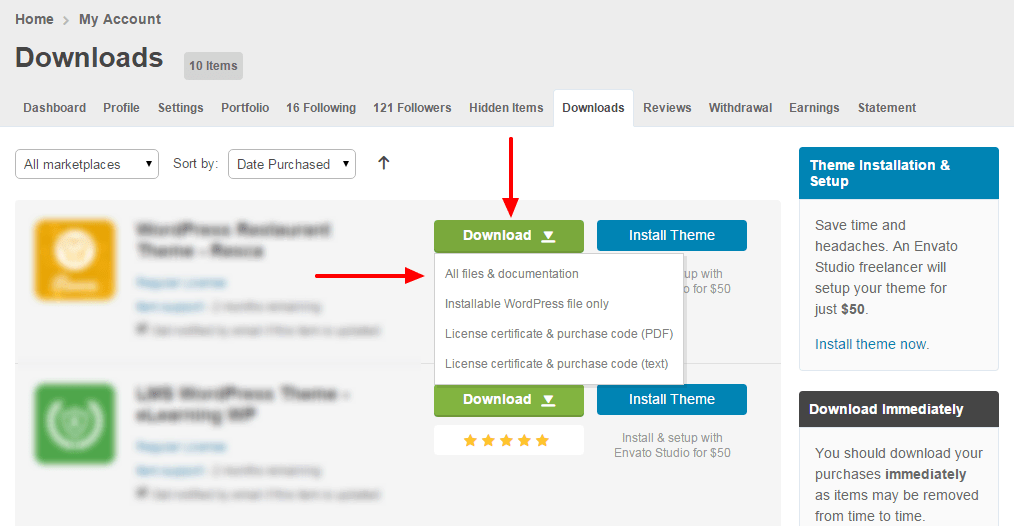
Get the JAVIER Theme installation package from your account(after login on Themeforest.net) at downloads page and save it to your computer.
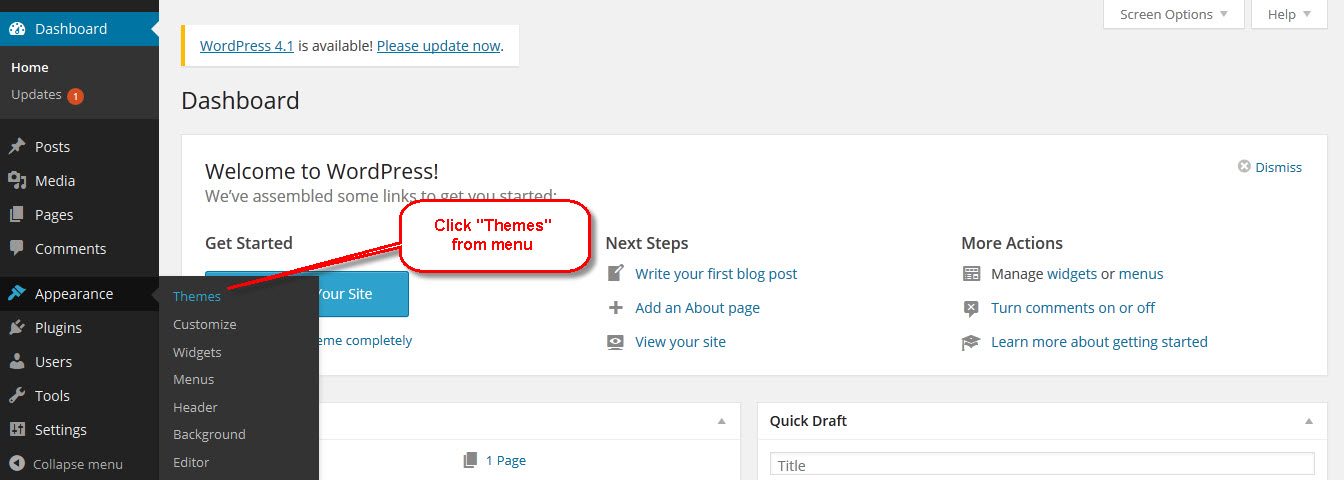
Step 1 - Login to your Wordpress Dashboard
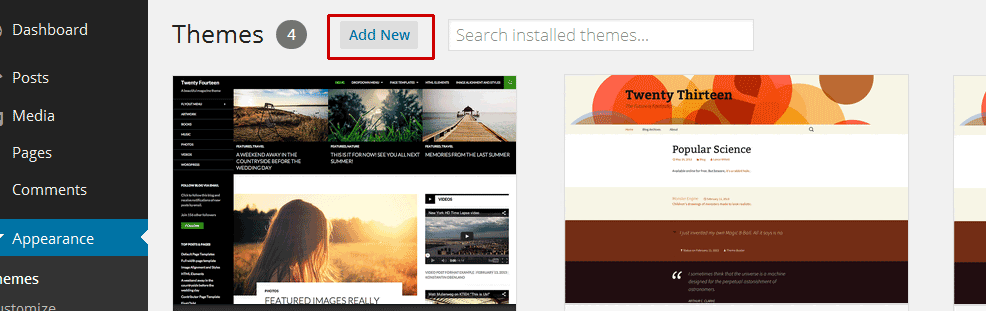
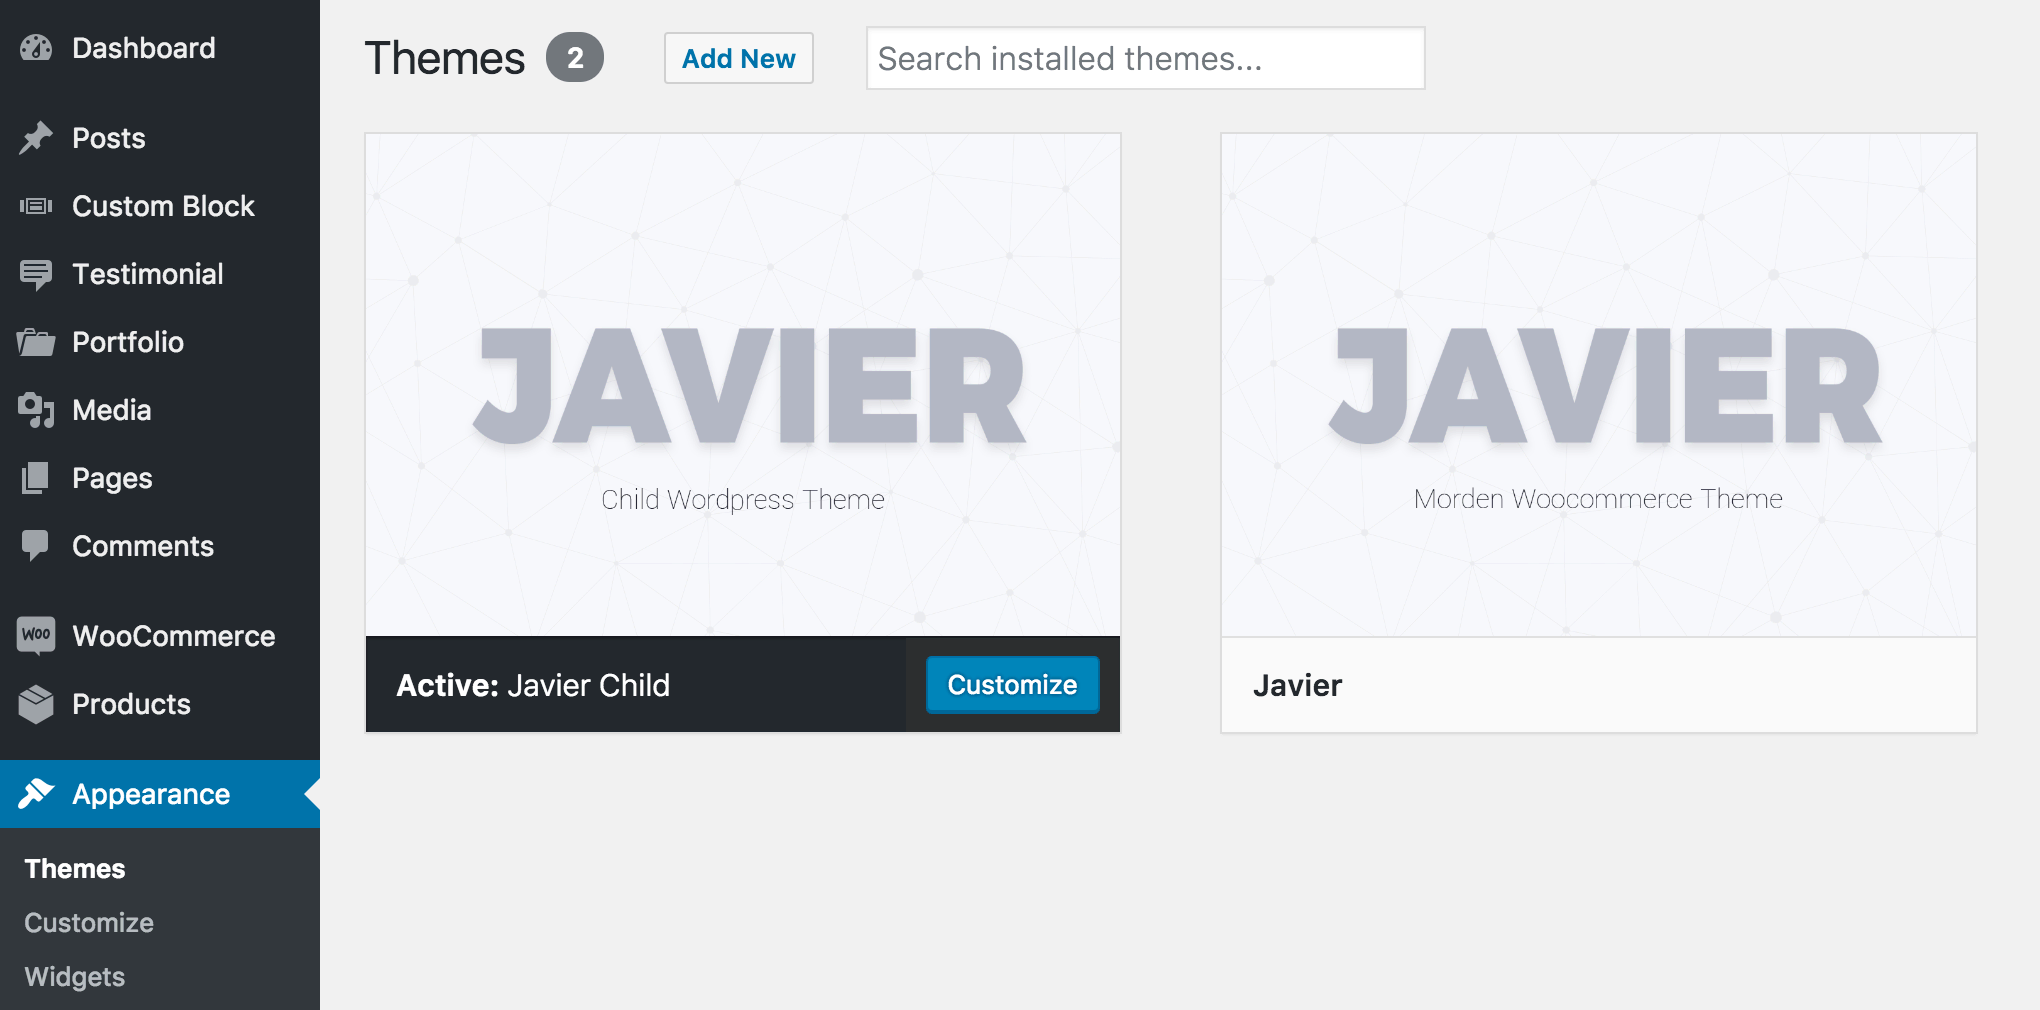
Step 2 - Go to Appearance > Themes. Click the Add New button or Add new theme link. (check screenshot below)
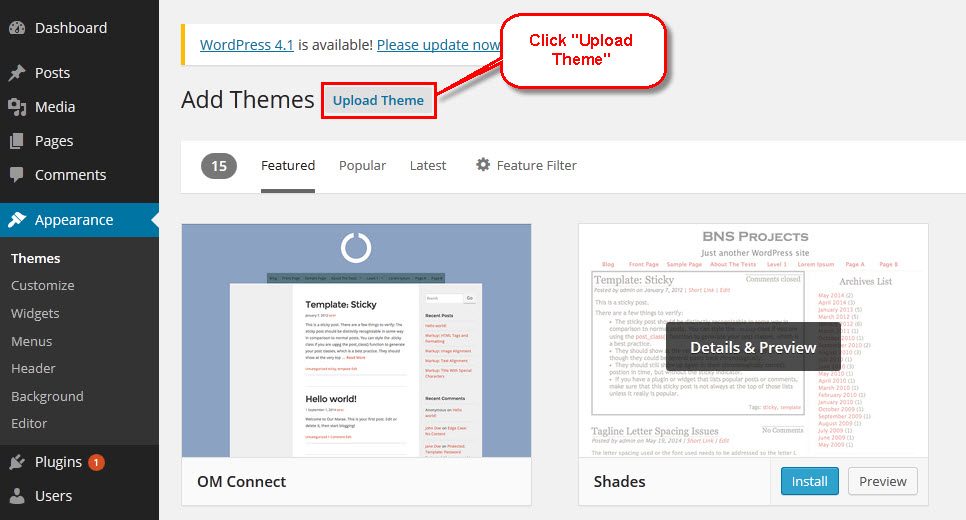
Step 3 - Click on the Upload Theme button. Locate "javier.zip" and click Install Now.
Step 4 - Click on the Activate button to activate JAVIER. Congratulations, you have now activated JAVIER! You can now proceed with JAVIER's Plugin Installation.
Step 1 - Log into your Hosting server using an FTP client (like FileZilla or WinSCP).
Step 2 - Locate "javier.zip" that you found in your ThemeForest Package and unzip it somewhere on your hard drive. Once it is unzipped it will look like a folder named JAVIER with all theme files in it.
Step 3 - Locate your Wordpress installation and upload the theme directory JAVIER (you unzipped in the previous step) into ../wp-content/themes/ in your Wordpress installation.
Step 4 - Click on the Activate button to activate JAVIER. Congratulations, you have now activated JAVIER! You can now proceed with JAVIER's Plugin Installation.
All plugins required have been zipped/already into your download package, so you only need to do is click on the "Begin installing plugins".
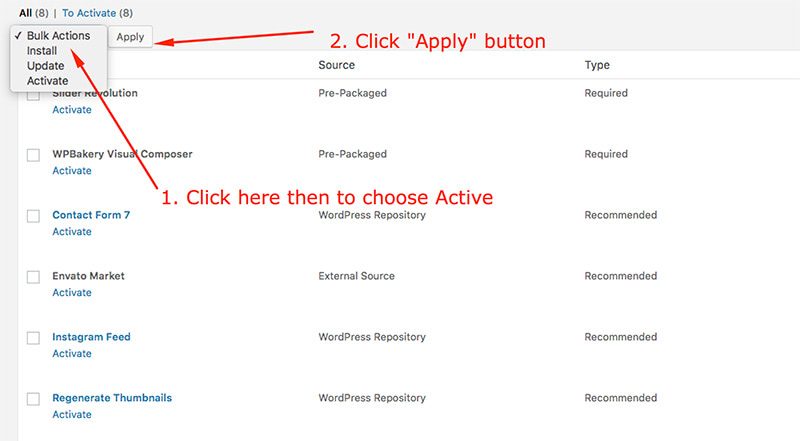
You should be navigated to the Install Required Plugin page, which shows a plugin list similar to this(list plugins on images below only an example, not for JAVIER):

Next, Click on the checkbox beside "Plugin" label to select all plugins in the list.
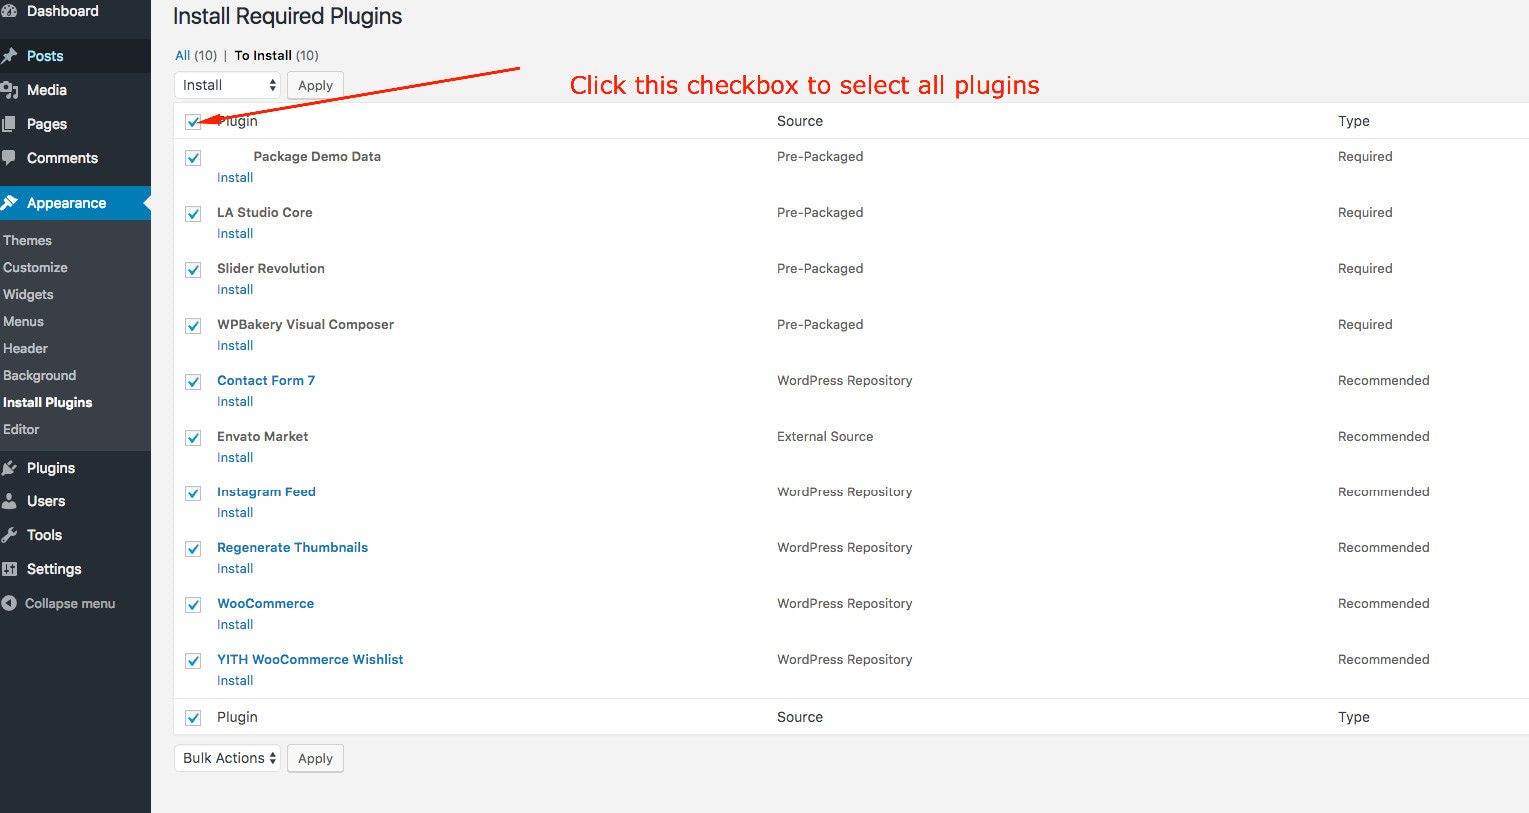
Then choose "Install" from the drop-down list at the top and then click "Apply".

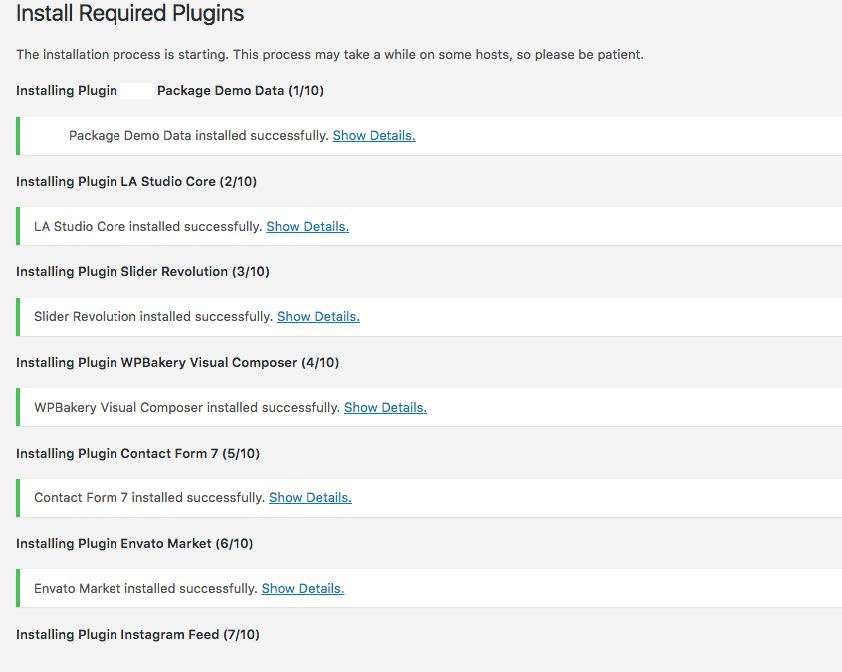
The installing process status will be shown in your browser. It may takes a few minutes, so please be patient. After sucessfull, your screen like that
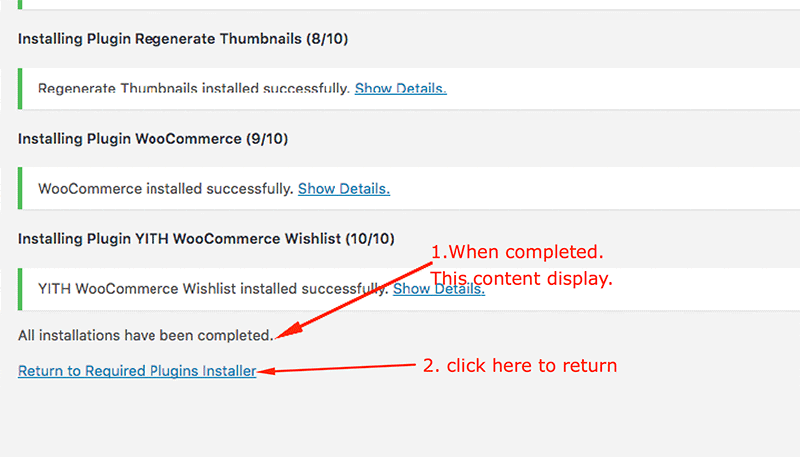
When the notice "All installations have been completed" appears, click on the "Return to Required Plugins Installer" link to turn back to the plugin list.
Next, click on the box beside the Plugin label again to select all plugins and choose Activate this time as image below.
There are a couple of different ways to update our WordPress themes to the latest version:
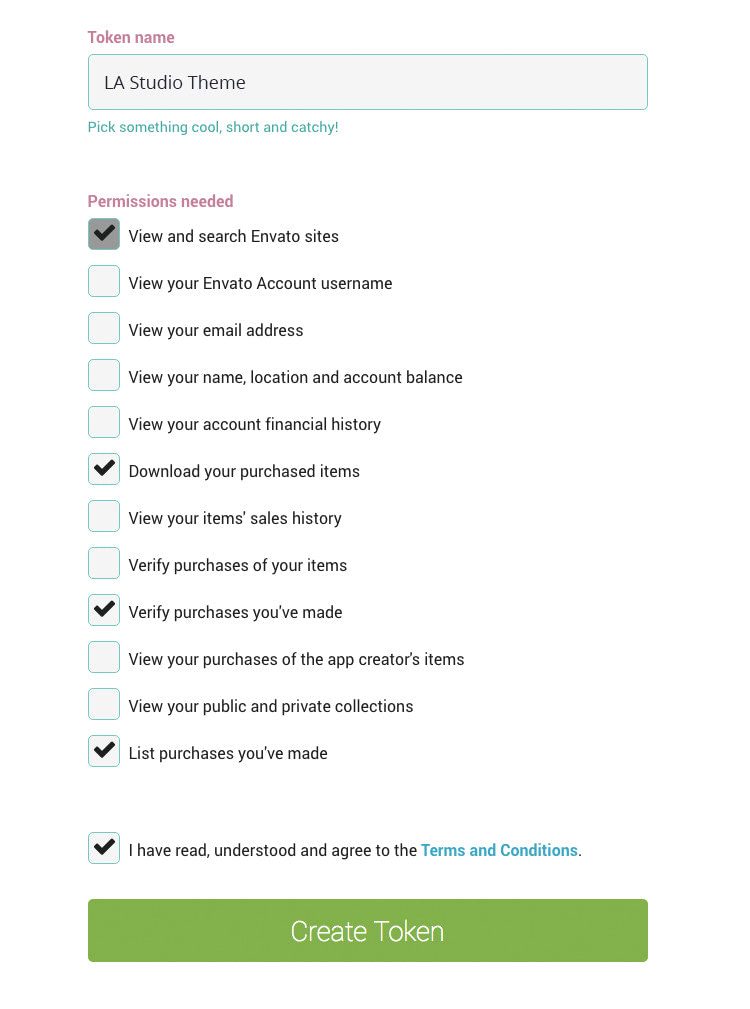
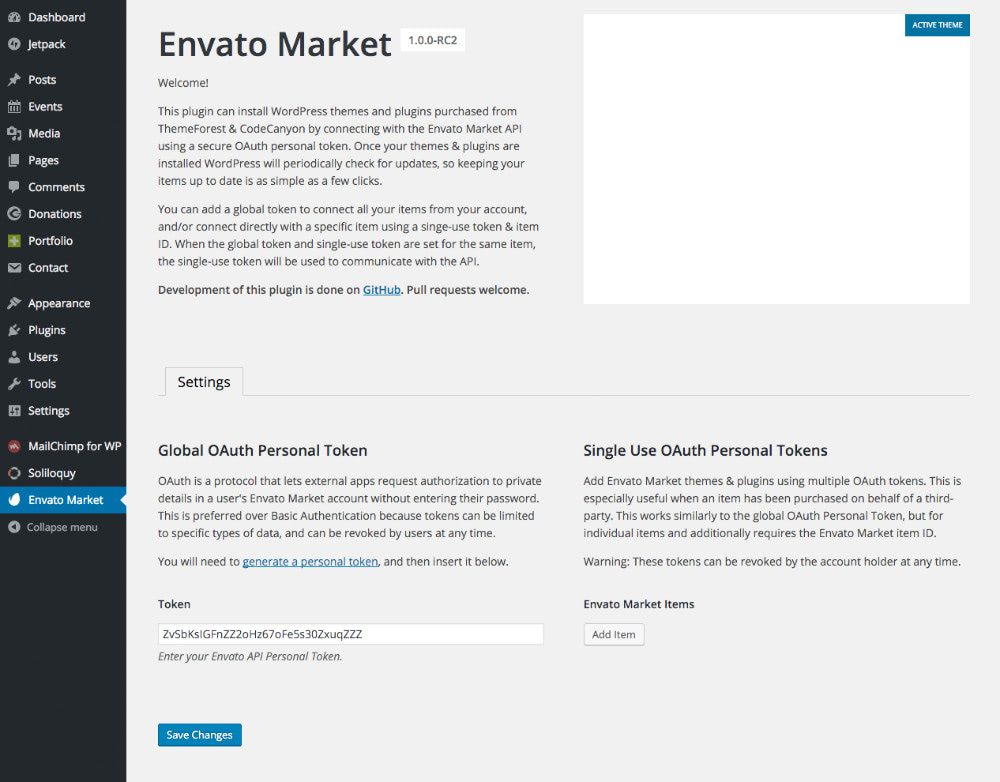
Once installed, activated, and setup, the Envato Market plugin will display a notice in your WordPress dashboard when an update is available. To setup:
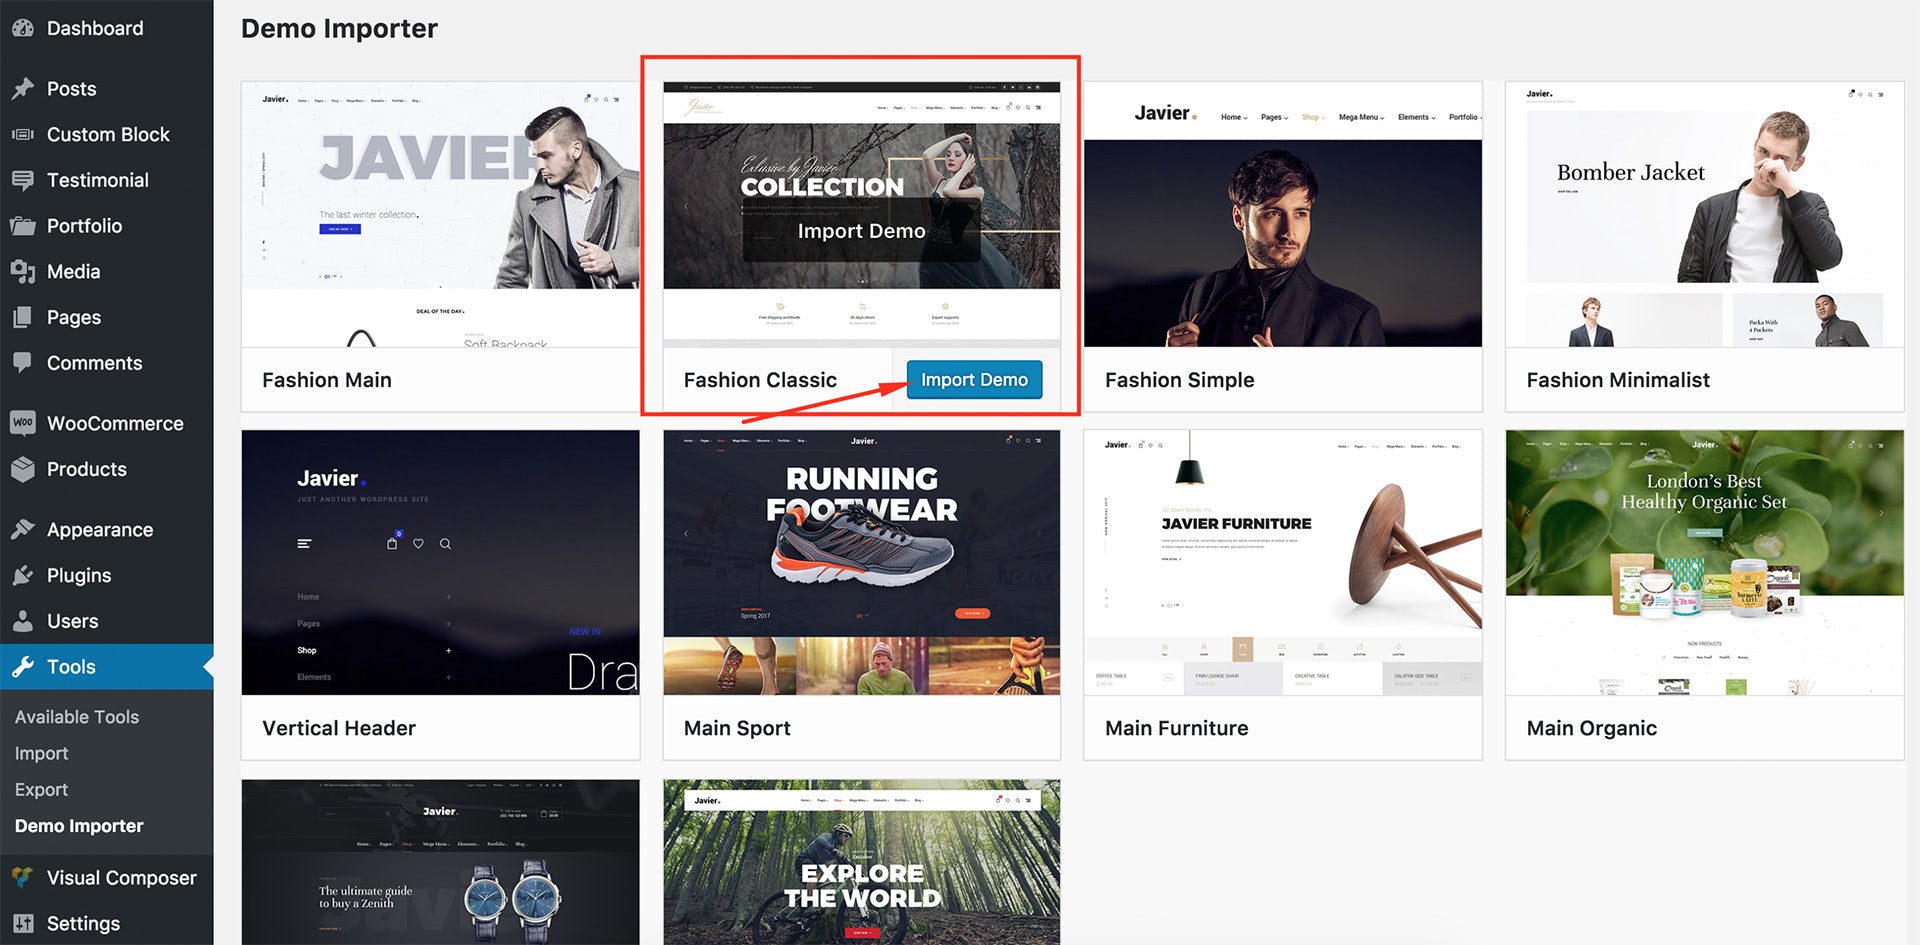
With JAVIER, you can build a functioning website just by clicking a button and install our demo data or click 4.2.1 Create A New Page to step by step. Your JAVIER installation will be set up with what we have on our demo website, and you can use it as a template to develop your own website.
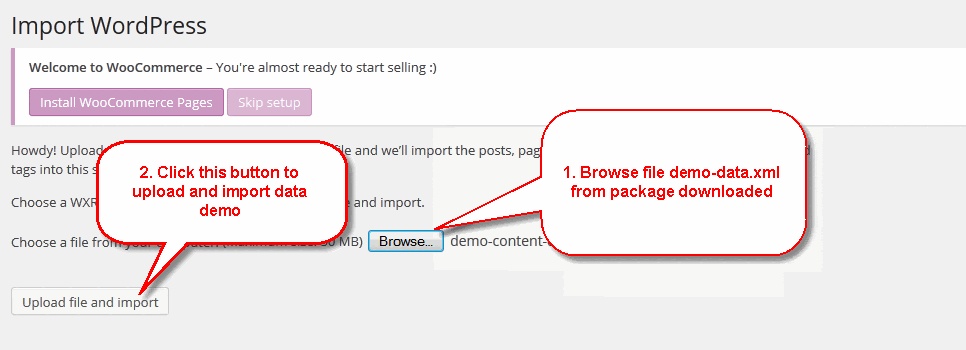
Go to Tools > Demo Importer
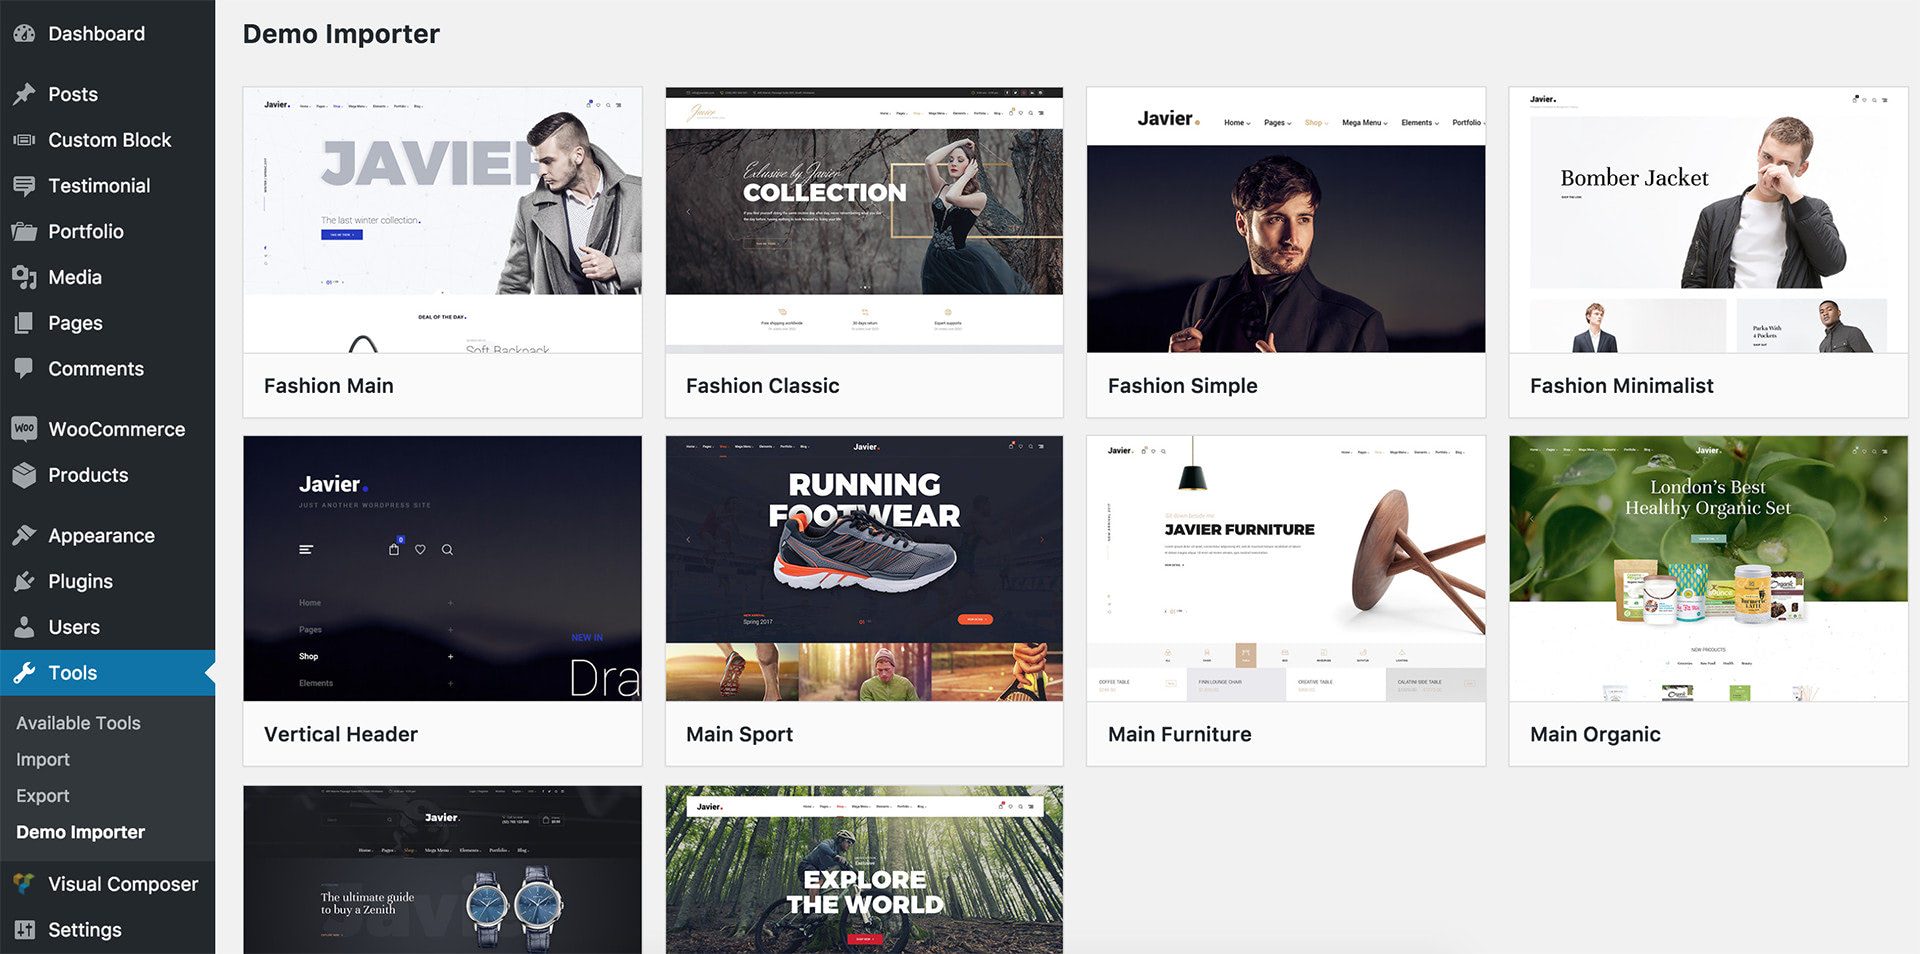
Then select the demo which you want import and click to button "Import Demo"
The progressing would be displayed on import status bars so you will know when it is finished and your data is ready.
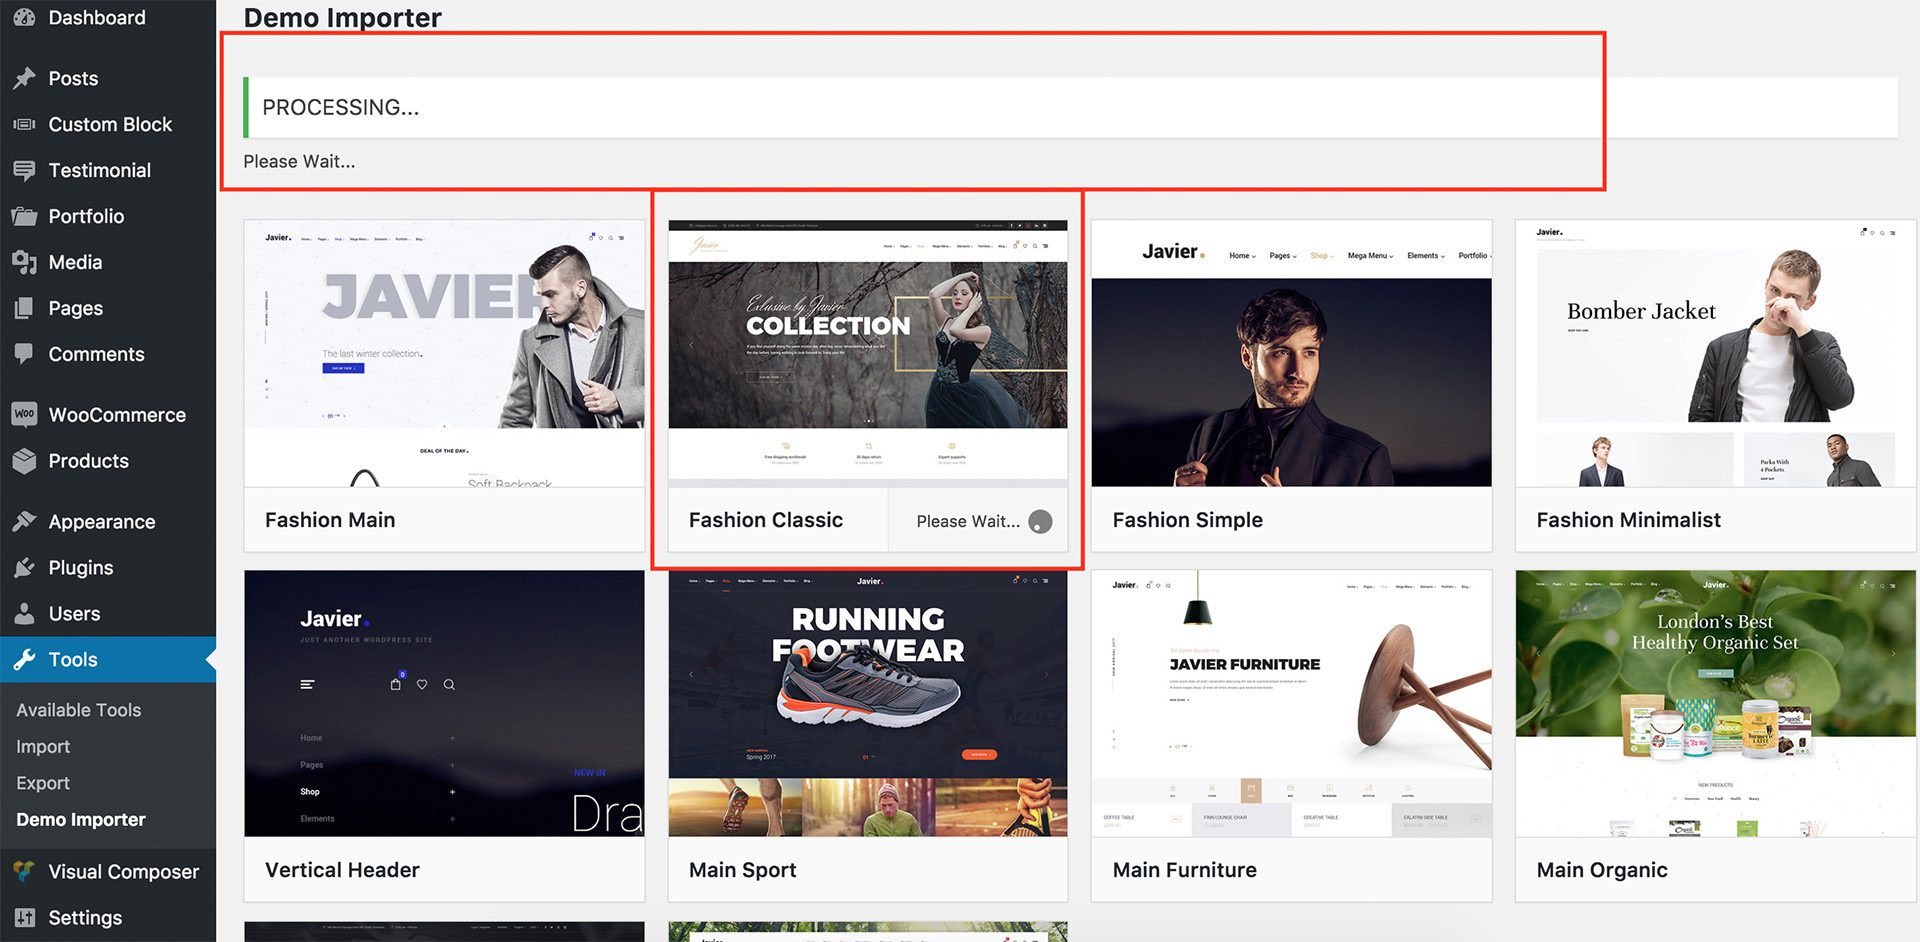
This process will take about some minutes
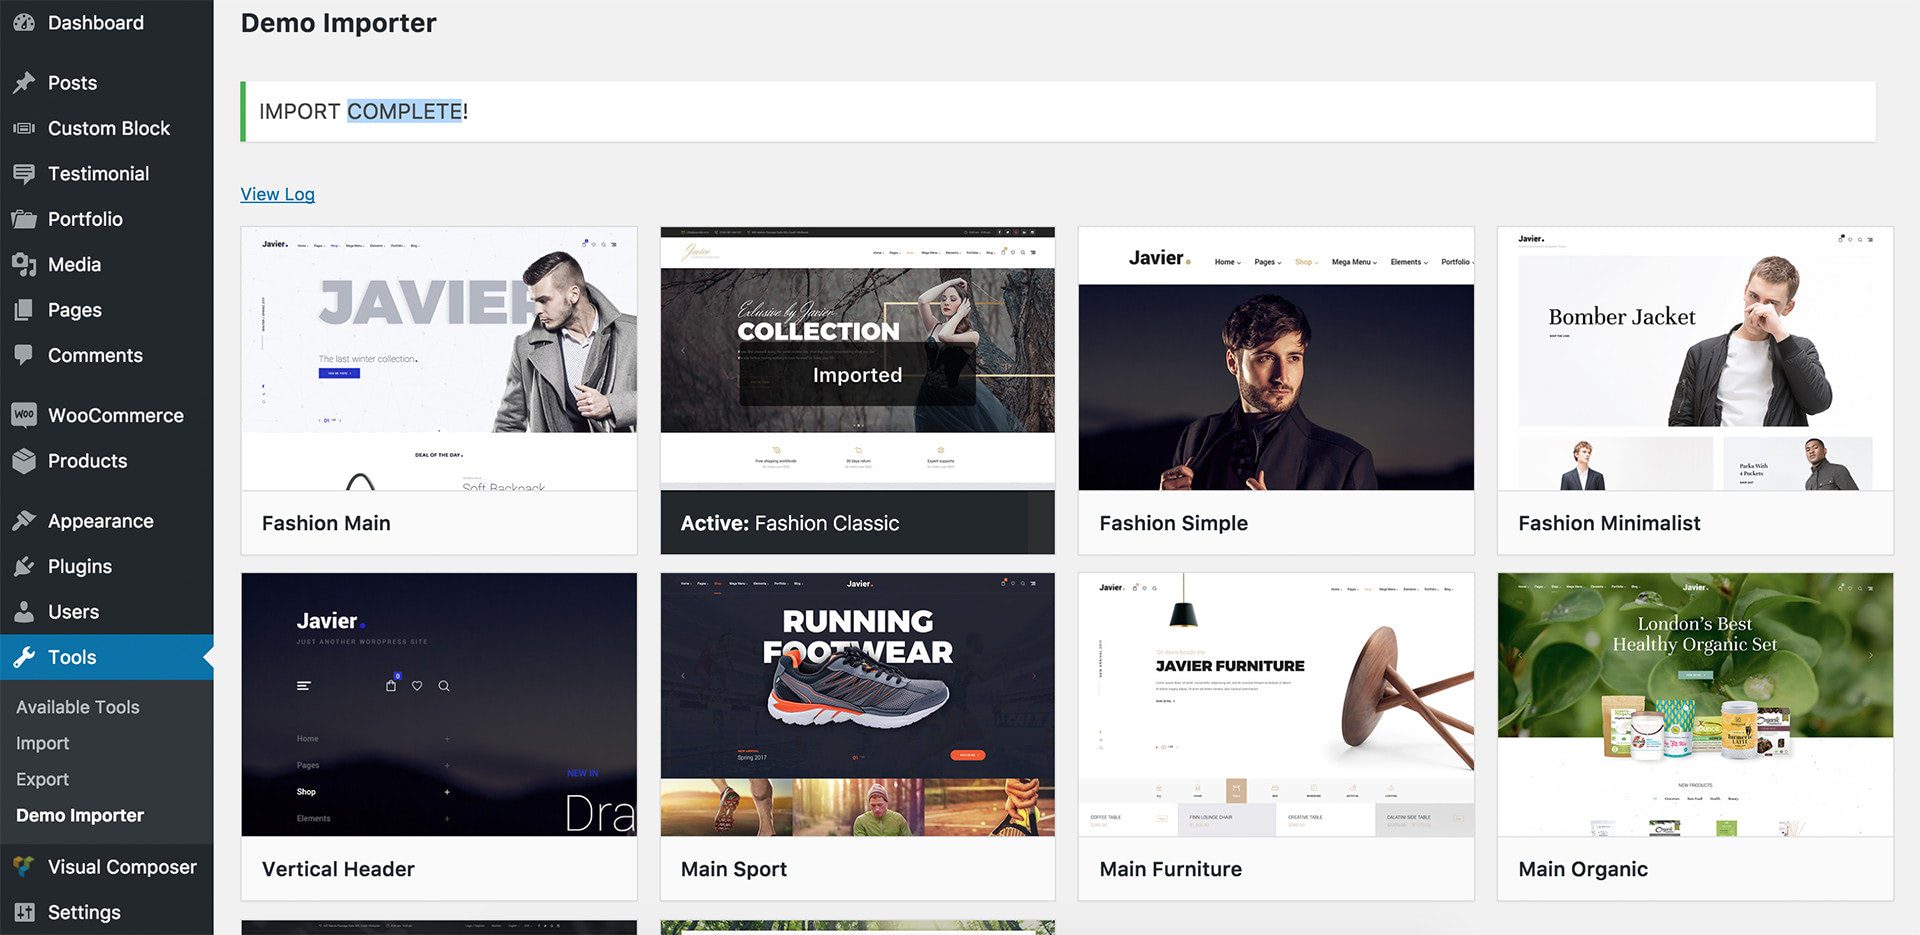
DONE. Now, you can visit your website to view demo.
You can create any number of pages with content. Our theme includes several page templates to choose from, and you will need to choose the page template that suits your needs. All of this is done in the pages section of your WordPress admin.
If you DID NOT One Click Install Demo Data, you will need to MANUALLY CREATE your Home and other pages. Here’s how to build it:
Step 1 – Navigate to Pages in your admin sidebar and click Add New option.
Step 2 – Input a new name for your page.
Step 3 – Set your Parent page. It’s usually set to No Parent.
Step 4 – Set your page template from the Template dropdown list.
Step 5 – Content for your page goes in the editing field, use the Visual or Text editor.
Next, you can publish this page and set it as your frontpage(5.2.9. Settings a static page as Home) in the Wordpress Settings panel.
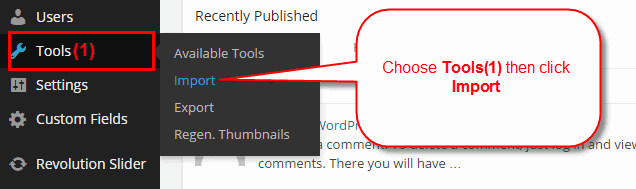
If you are new to WordPress and have problems with setting up the theme you might want to import the demo content file that comes with the theme. The following actions will import some dummy posts and pages from the live preview:
Select WordPress from the list

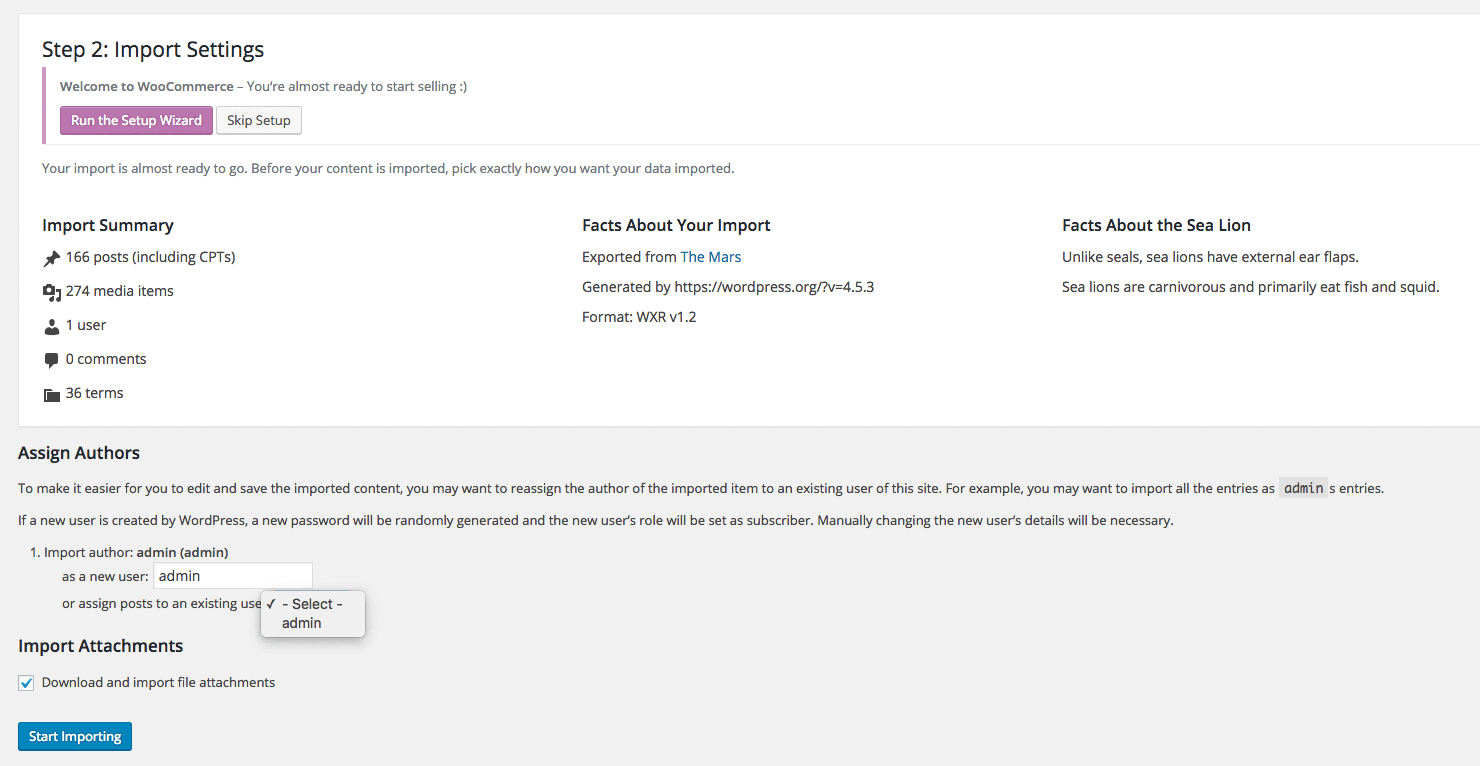
Continue with steps in image

Display asked to import author, selected and continue
After completing all above steps, you must re-check somethings compare wih my demo, because have some settings/data maybe not include.
If you don't want to use the demo content pack, you can read the instructions on how to work with our theme built-in page to make your own pages.
In this section will provide a list of pre-defined sidebars as well as a map of their locations on a page, so that you will find it easier when pulling out widgets to set up your site.

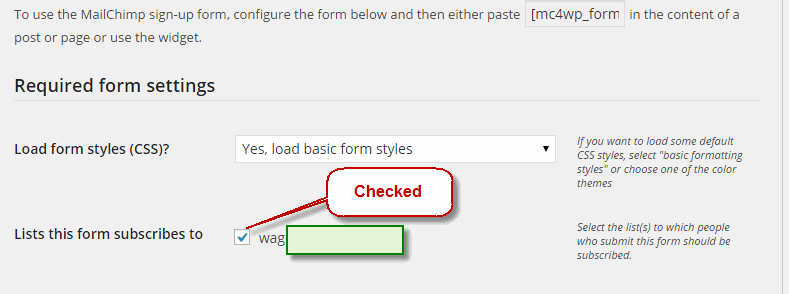
You can do step by step as image below to build contact form

You can visit Contact Form 7 Plugin to further details.
Or copy and paste content below to Form field(see image above)
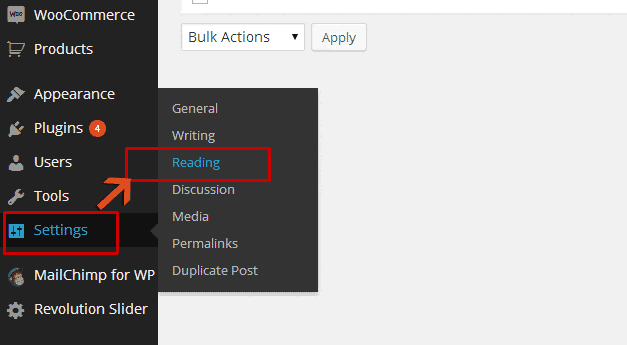
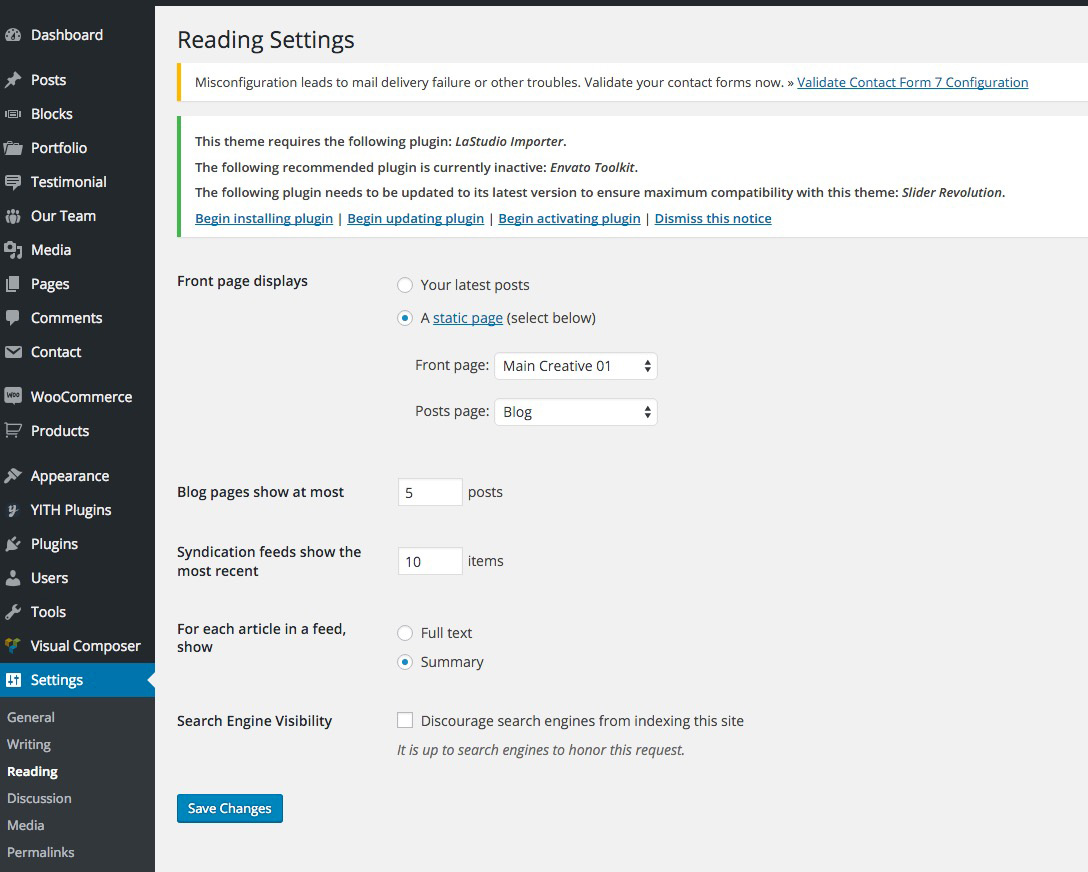
You can adjust WordPress settings as follow:
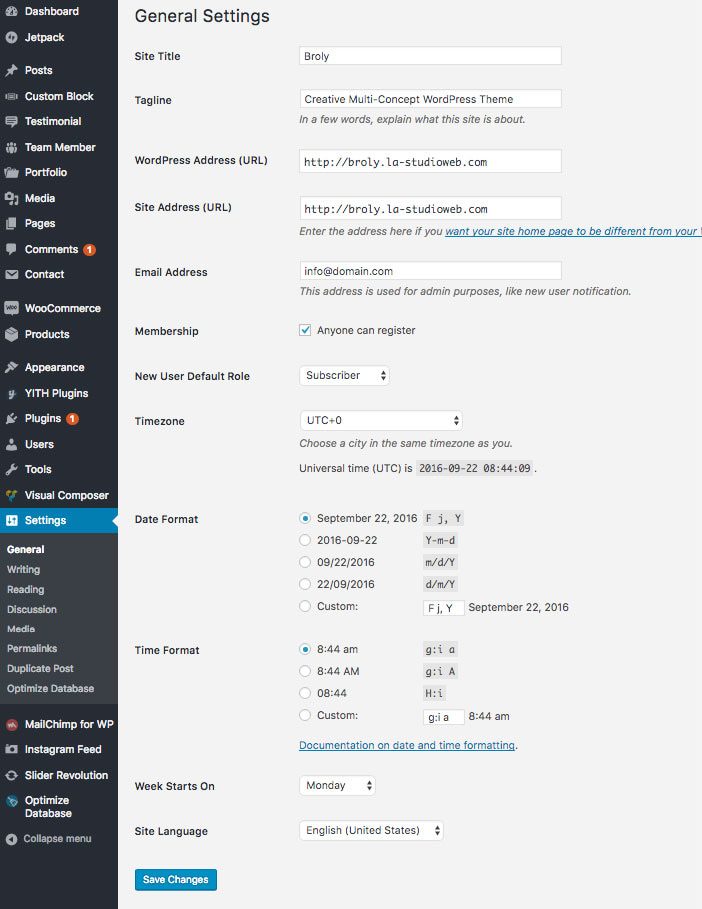
Step 1 – You can set Site Title, Tagline in Settings > General
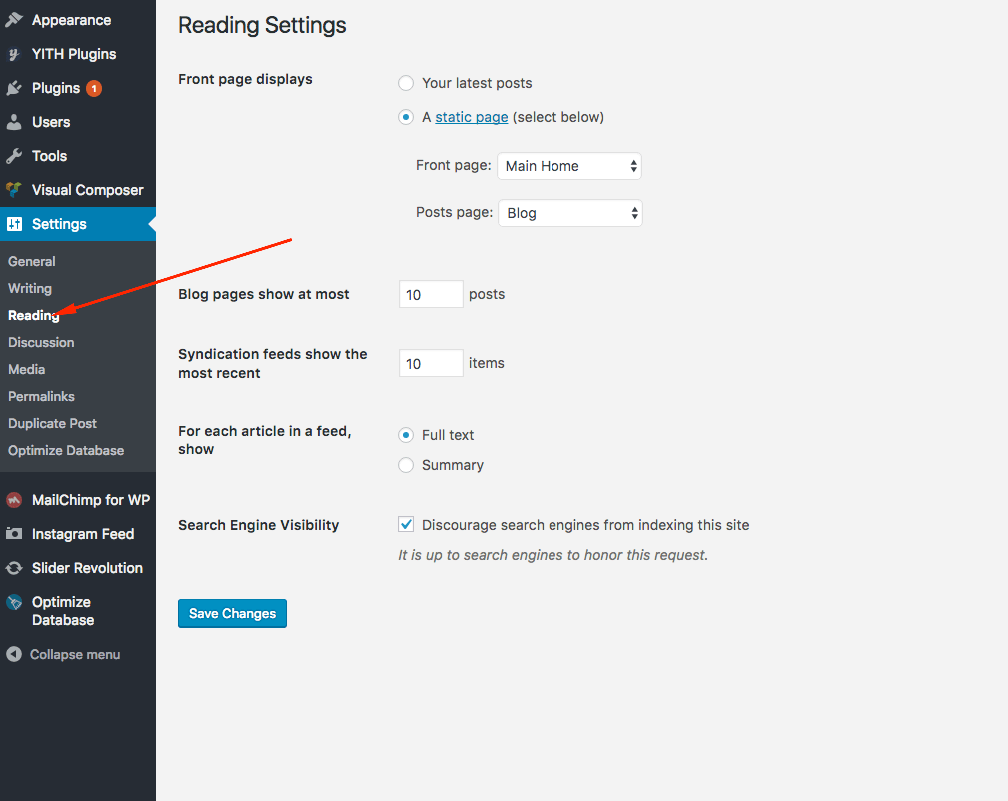
Step 2 – You can set Blog pages show at most in Settings > Reading
Step 3 – You can select Front Page displays in Settings > Reading
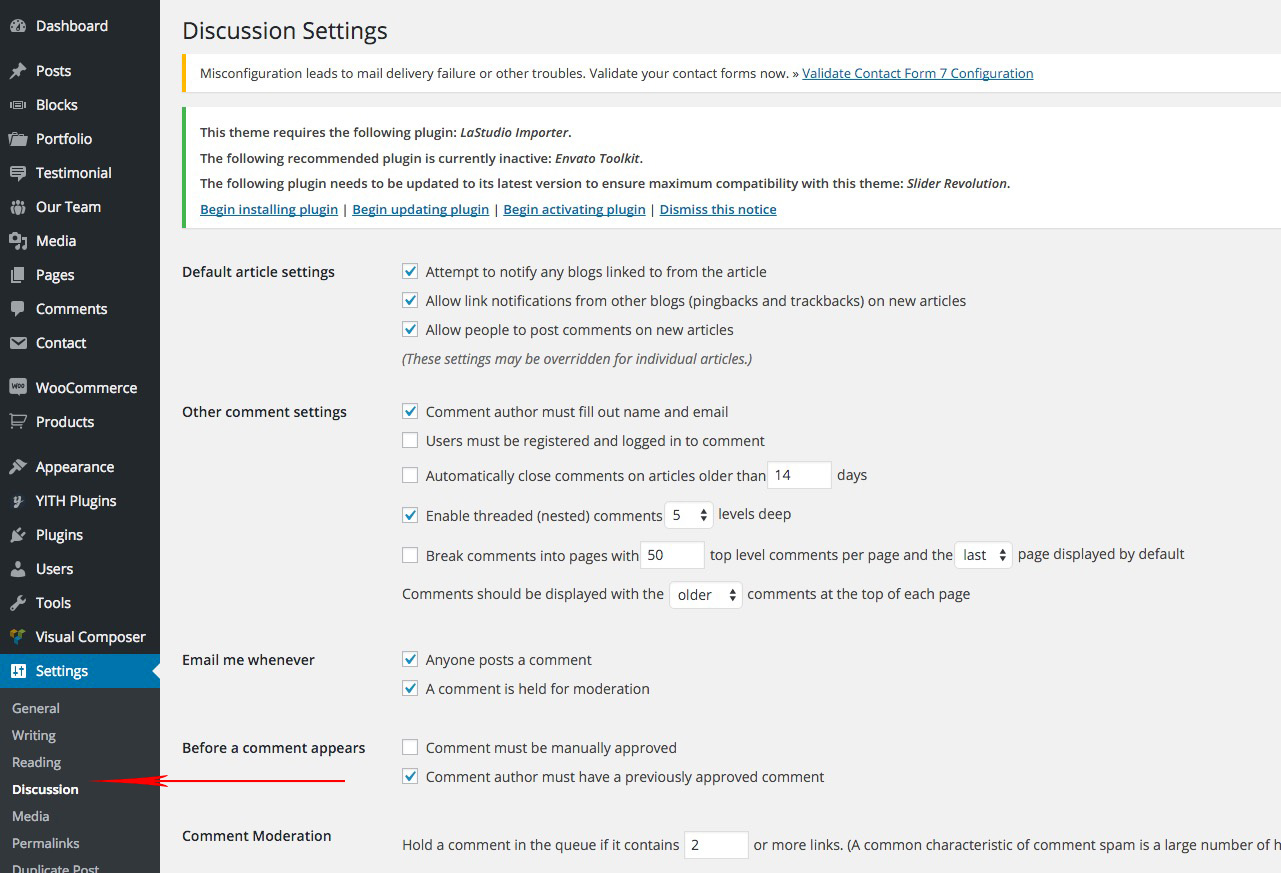
Step 4 – You can set Discussion settings in Settings > Discussion
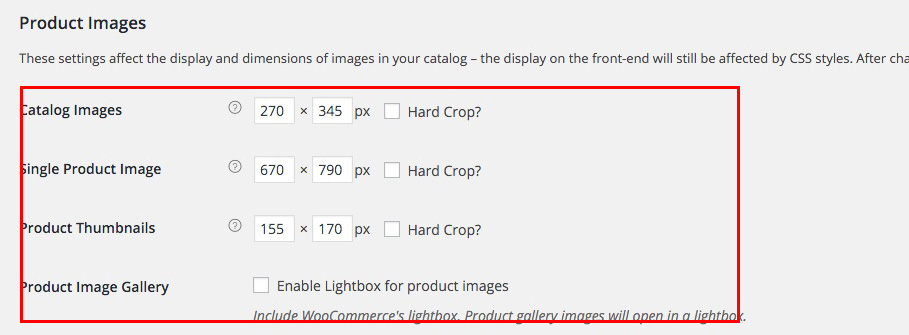
Step 5 – You can change Image sizes in Settings > Media
We used the following sizes on our demo sites:
Thumbnail size: 370 x 250
Medium size: 570 x 380
Large size: 770 x 390
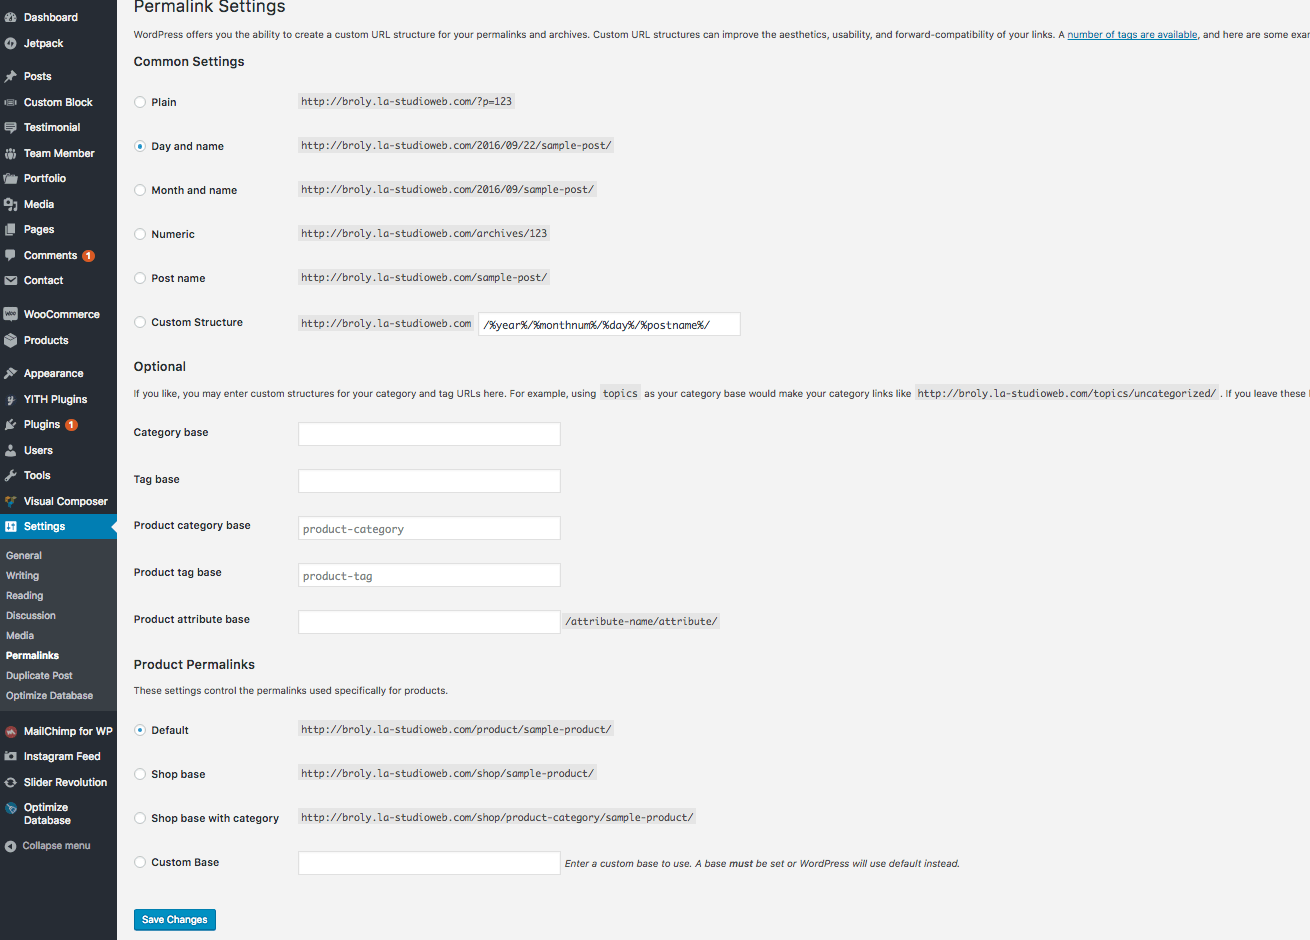
Step 6 – You should ensure that a non-default permalink setting is selected, e.g. Month and name in Settings > Permalinks
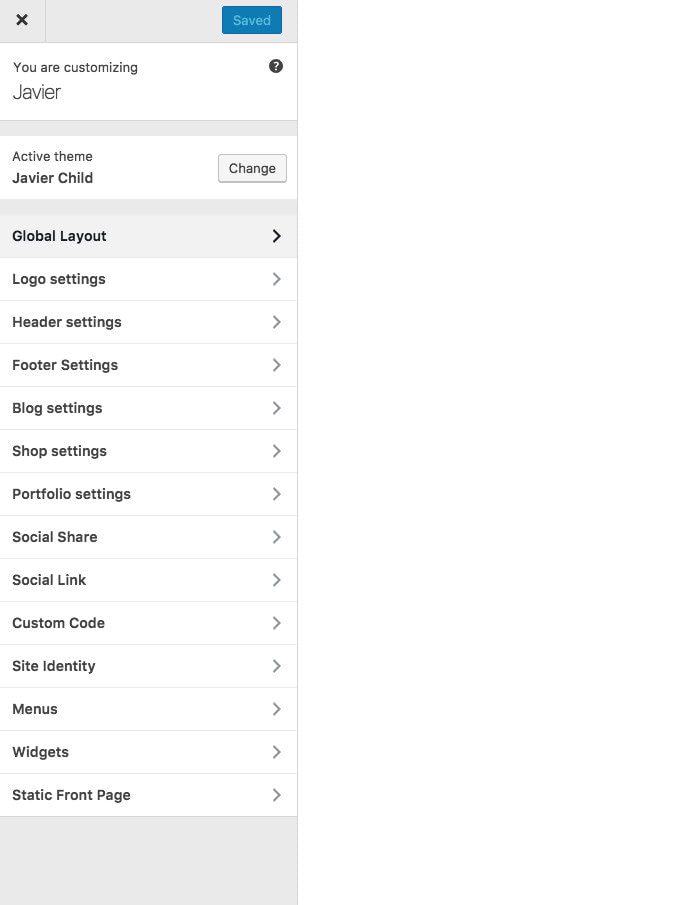
"Global Layout" tab is divided into a few sections. Asides from the Install Demo Data section mentioned above, there are a few important sections for you to customize your layout.

| Attribute | Description |
|---|---|
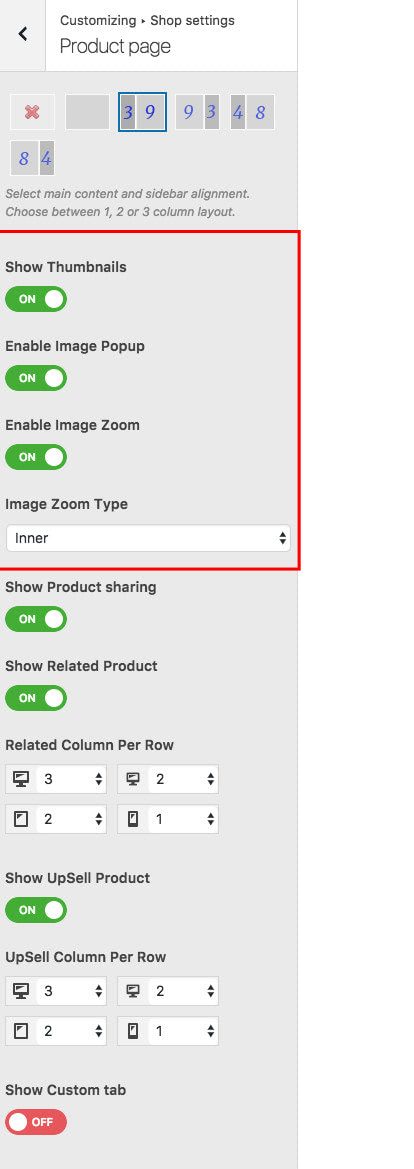
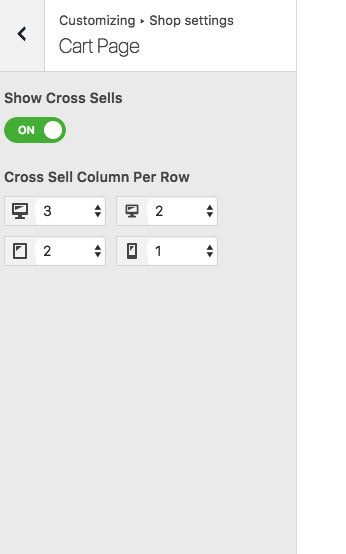
| Layout | Select main content and sidebar alignment. Choose between 1, 2 or 3 column layout. |
| Enable Main FullWidth | layout website full screen |
| Enable Google Rich Snippets | Show Google Rich Snippets In the Breadcrumbs |
| Show Button "Back To Top" | Turn on this option if you want to enable "back to top" button on your site |
| Enable Page Loader Icon | Turn on Overlay & Icon loader when visit page |
![]()
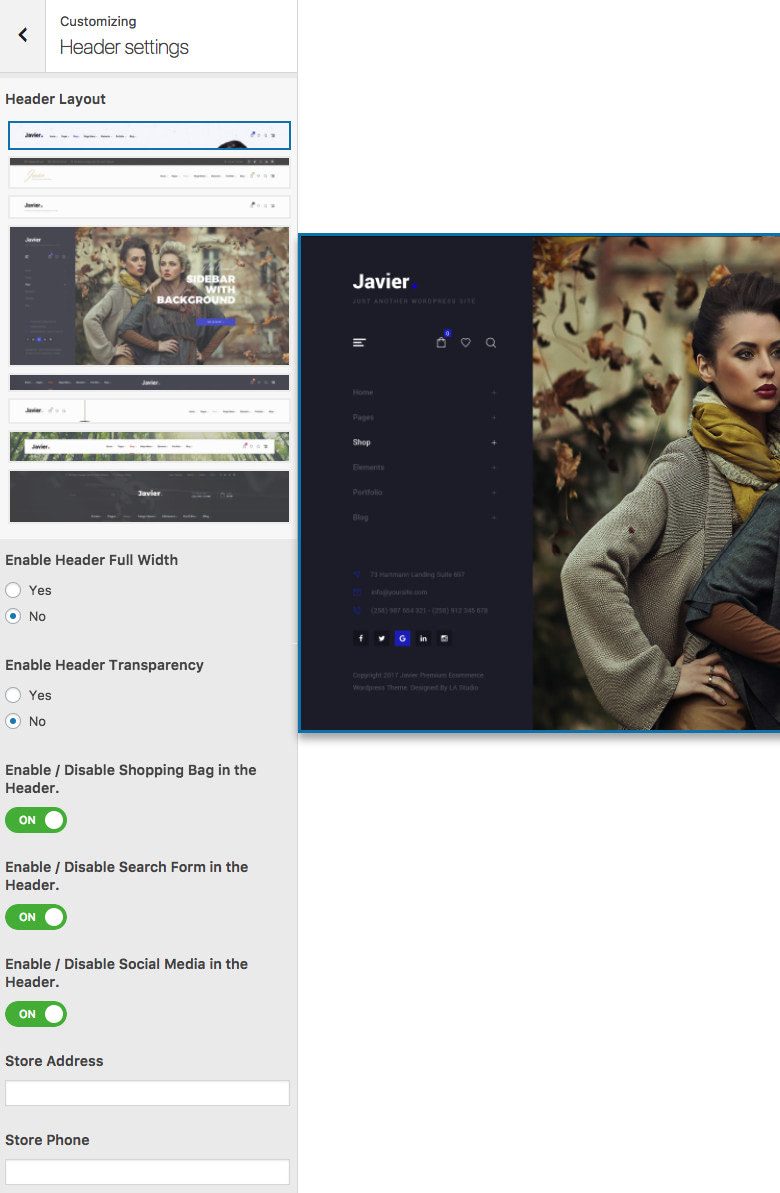
In this section you can control global header settings of your site
In this section you can control all footer settings of your site
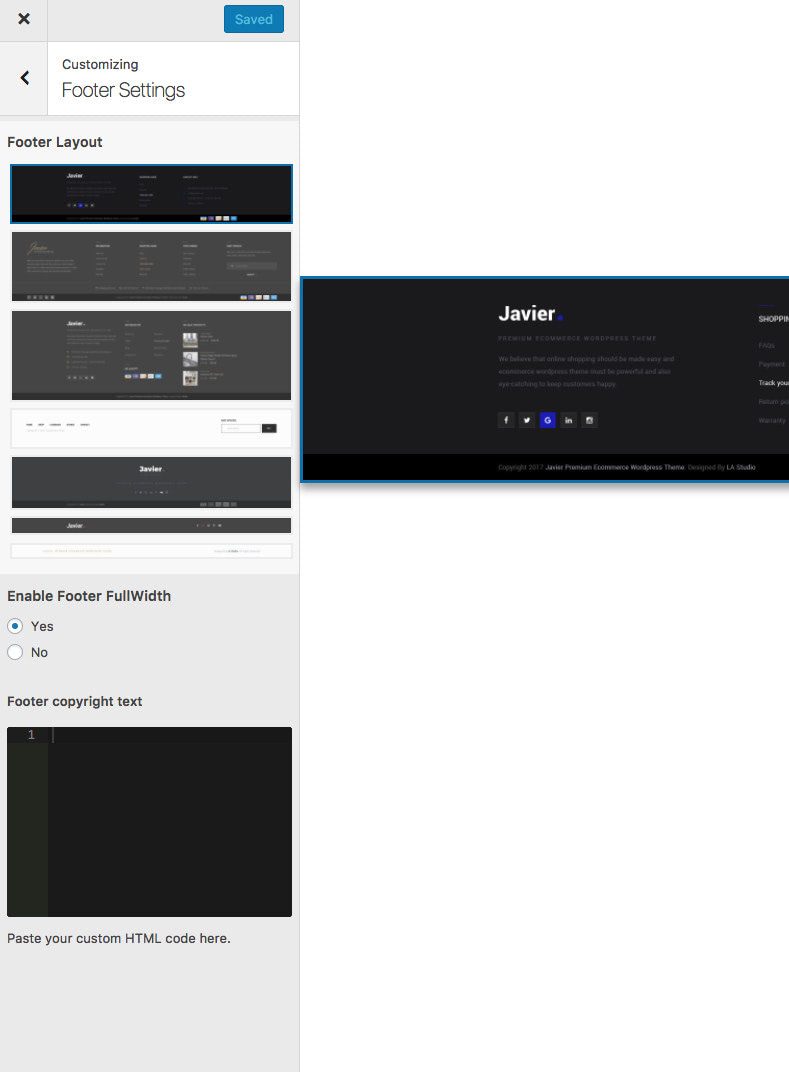
| Attribute | Description |
|---|---|
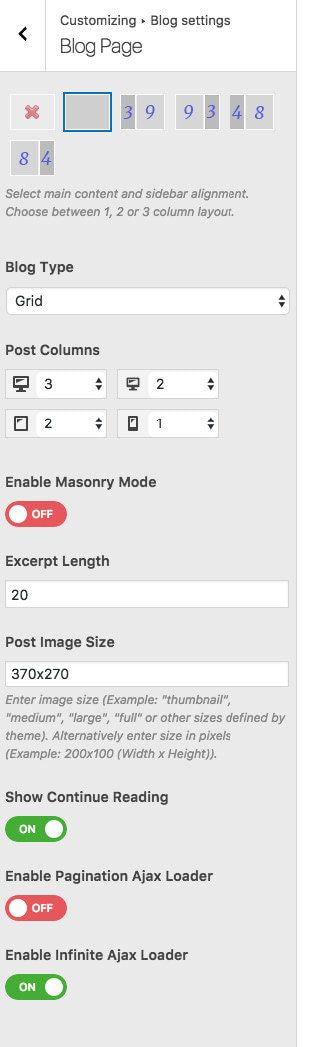
| Layout | Select main content and sidebar alignment. Choose between 1, 2 or 3 column layout. |
| Blog Type | Post item will be display (Ex: Grid, List ..) |
| Post columns | Number post will be displaying in per row |
| Enable Masonry Mode | If value is "ON" the masonry mode is enable |
| Excerpt Length | Type Number ( Number characters of excerpt will be displayed |
| Post Image Size | Enter image size (Example: "thumbnail", "medium", "large", "full" or other sizes defined by theme). Alternatively enter size in pixels (Example: 200x100 (Width x Height)). |
| Show Continue Reading | If value is "ON" the link "Continue reading" will be display |
| Enable Pagination ajax loader | |
| Enable Infinite Scroll |
| Attribute | Description |
|---|---|
| Layout | Select main content and sidebar alignment. Choose between 1, 2 or 3 column layout. |
| Blog Type | Post item will be display (Ex: Grid, List ..) |
| Post columns | Number post will be displaying in per row |
| Enable Masonry Mode | If value is "ON" the masonry mode is enable |
| Excerpt Length | Type Number ( Number characters of excerpt will be displayed |
| Post Image Size | Enter image size (Example: "thumbnail", "medium", "large", "full" or other sizes defined by theme). Alternatively enter size in pixels (Example: 200x100 (Width x Height)). |
| Show Continue Reading | If value is "ON" the link "Continue reading" will be display |
| Enable Pagination ajax loader | |
| Enable Infinite Scroll |
In this section you can control all single blog settings of your site
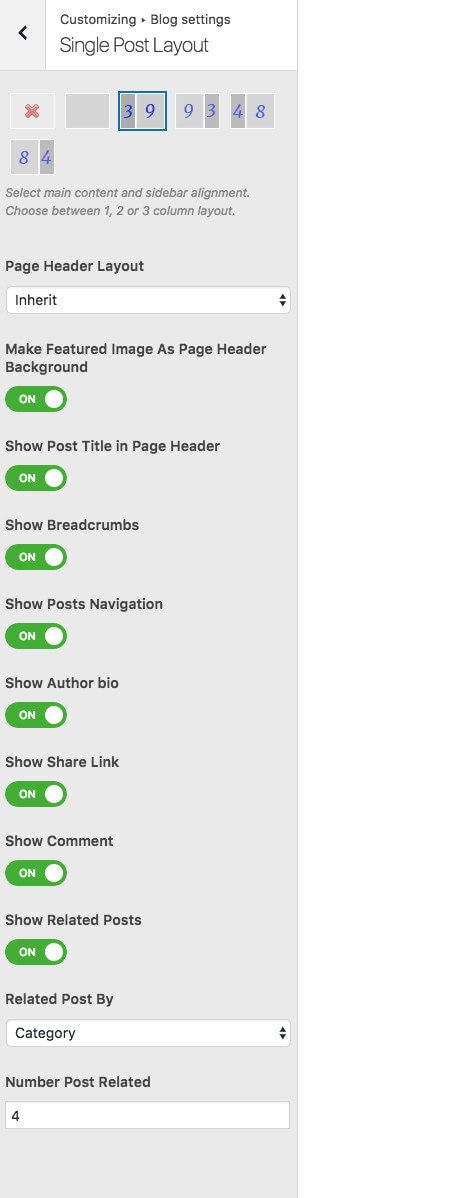
| Attribute | Description |
|---|---|
| Custom Page Layout | Select main content and sidebar alignment. Choose between 1, 2 or 3 column layout. |
| Show Breadcrumbs | Turn Off this option if you want to hide breadcrumbs info area on single blog |
| Show Posts Navigation | Turn Off this option if you want to hide navigation on single blog |
| Show Author Info | Turn Off this option if you want to hide author info area on single blog |
| Show social share link | Turn Off this option if you want to hide social share link area on single blog |
| Show comment | Turn Off this option if you want to hide comment form area on single blog |
| Related Post | Turn Off this option if you want to hide related post area on single blog |
| Related Post By | |
| Related Post Columns | Number columns rel pos display |
In this section you can control all colors settings of your site

| Attribute | Description |
|---|---|
| General | Inlcuded: Primary Color, Text Color, Wrapper Background Color, Article Background Color. |
| Header | Inlcuded: Background Color, Text Hover Color, Navigation Customize Color |
| Footer | Inlcuded: Background Color, Text Color, Text Hover Color |
In this section you can control all typography settings of your site

| Attribute | Description |
|---|---|
| Body Font | Inlcuded: Font Family(name of font), Font Size, Font Weight. |
| Primary Font | Inlcuded: Font Family(name of font) |
| Secondary Font | Inlcuded: Font Family(name of font) |
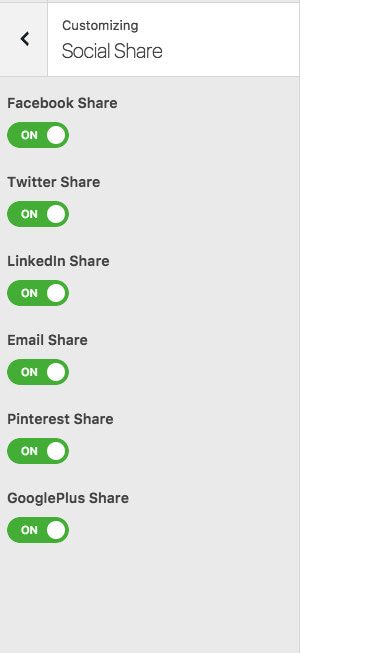
In this section you can control all social settings of your site
| Attribute | Description |
|---|---|
| Social Share | Use for share on each post, inlcuded: facebook, twitter, linkedin, google, tumblr, pinterest. |
| Social Profiles | Define link social profiles, inlcuded: Dribbble, Vimeo, Github, Xing, Behance, Deviantart, SoundClound, Yelp, Rss, VK, Email, Instagram, Foursquare, Skype, Flickr, facebook, twitter, linkedin, google, tumblr, pinterest |
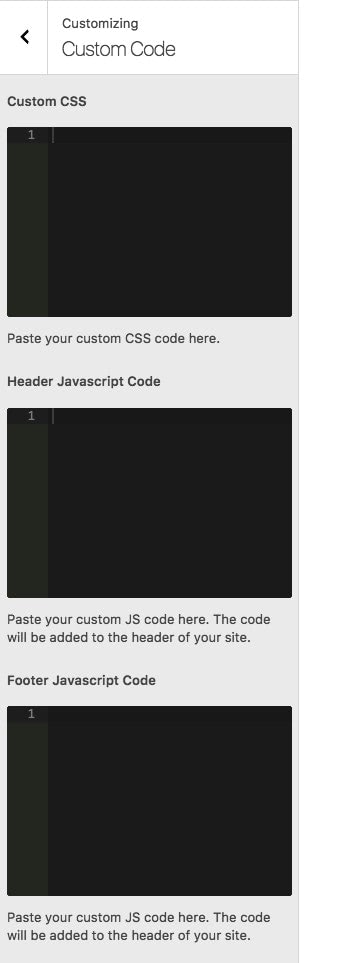
In this section you can custom css & javascript of your site
| Attribute | Description |
|---|---|
| Custom CSS | Add some CSS to your theme by adding it to this text-area. Please do not include any style tags. |
| Custom Javascript | Add some Javascript to your theme by adding it to this text-area. Please do not include any style tags. |
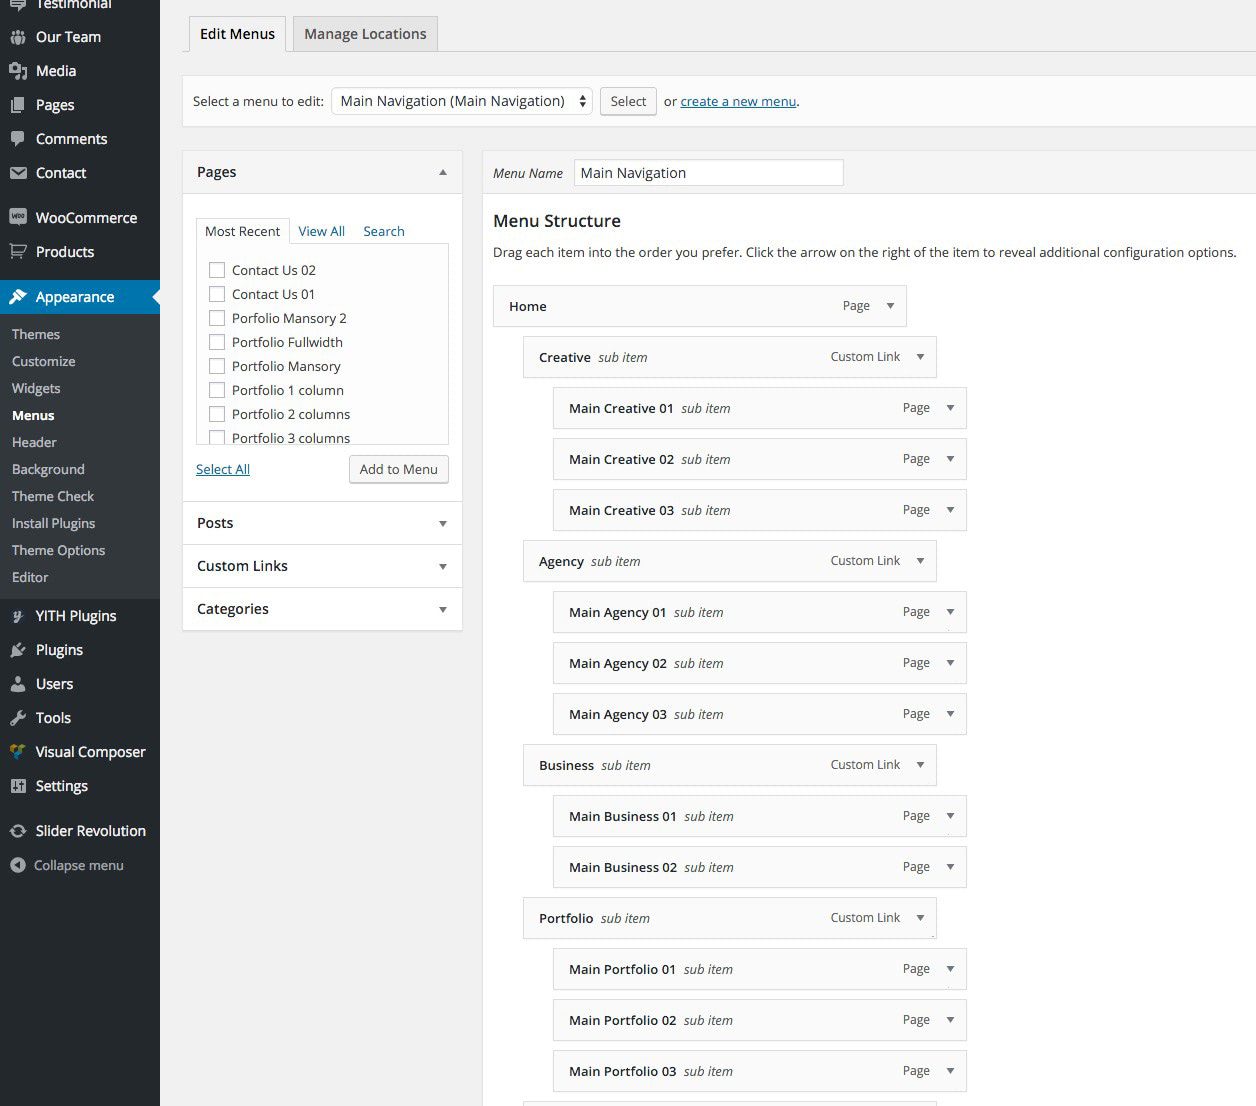
In this section you can do all things about menu on your site(create, delete, update)
| Attribute | Description |
|---|---|
| Menu Location | Choose menu display on Main location. Your theme supports one menu. Select which menu you would like to use. You can also place menus in widget areas with the Custom Menu widget. |
| Footer Menu | Add/delete/update menu item for Footer menu here |
| Main Menu | Add/delete/update menu item for Main menu here |
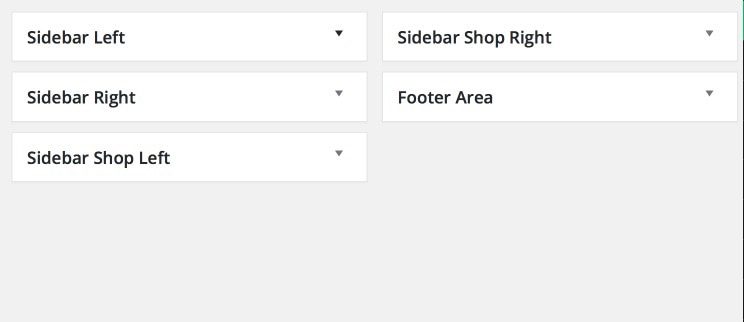
In this section you can do all things about widgets on your site(create, delete, update). Have 11 widget areas, included: Main Sidebar, Logo Sidebar, After Featured Area, Before Posts Area, Footer Above 1, Footer Above 2, Footer Full Width, Footer 1, Footer 2, Footer 3, Footer 4
| Name Area | Description |
|---|---|
| Main Sidebar | Add widgets here to appear in your sidebar |
| Logo Sidebar | Appears at the left of the logo on posts and pages. |
| After Featured Area | Appears at the after of featured area on homepage. |
| Before Posts Area | Appears at the before of posts area on homepage. |
| Footer Above 1, Footer Above 2 | Appears at the top of the footer on posts and pages. |
| Footer Full Width | Appears at the top of the footer on posts and pages. |
| Footer 1, Footer 1, Footer 3, Footer 4 | Appears at the footer. |
If you installed the Demo Content, you don’t need to choose a Home Page because my theme do it. In case you creat page manual then following these steps to set a new Page to FrontPage:
Save all your changes!
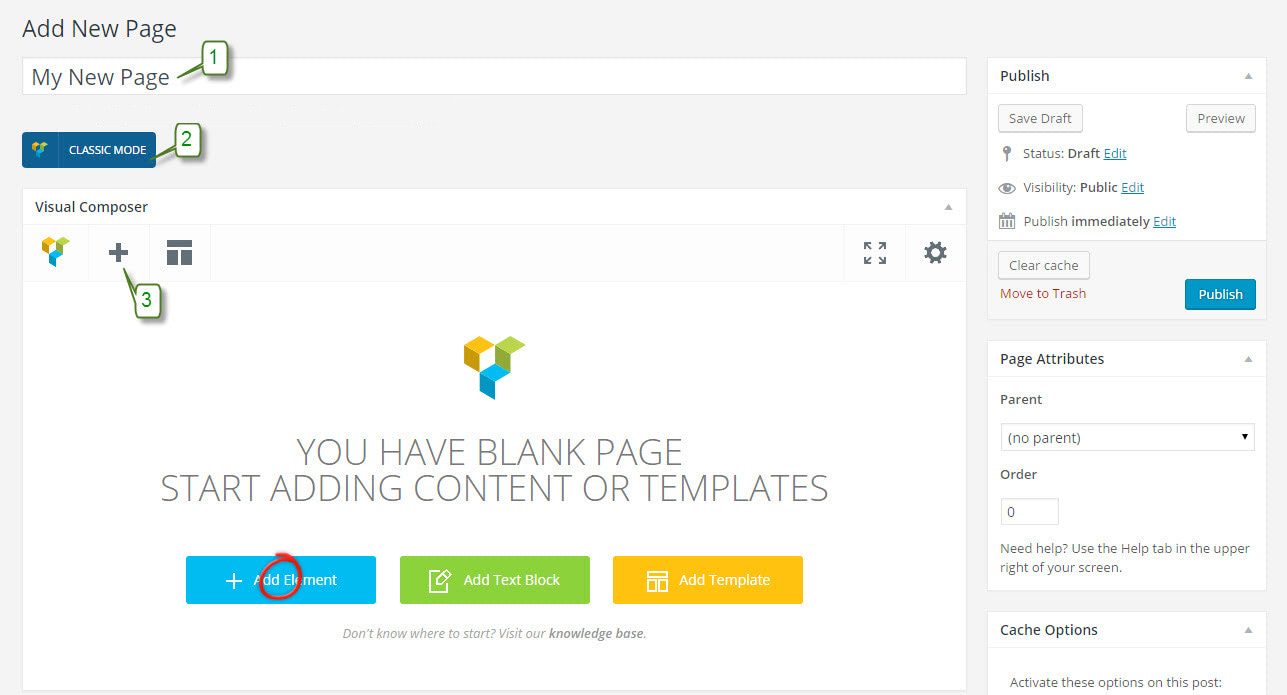
Content management is a breeze with Fortuna and it requires absolutely no coding skills. Using a highly customized version of the Visual Composer plugin the theme offers a user friendly Drag'n'Drop interface for easy page creation and editing. Follow these simple steps to create a Page with Academia:
Step 1:Go to Pages > Add new in your Dashboard. Add a Title to your Page (top field).
Step 2:Switch to Backend Editor if you are currently under Classic Mode (button below Title field).
Step 3:Start adding page content by clicking on the Plus button or Add Element.
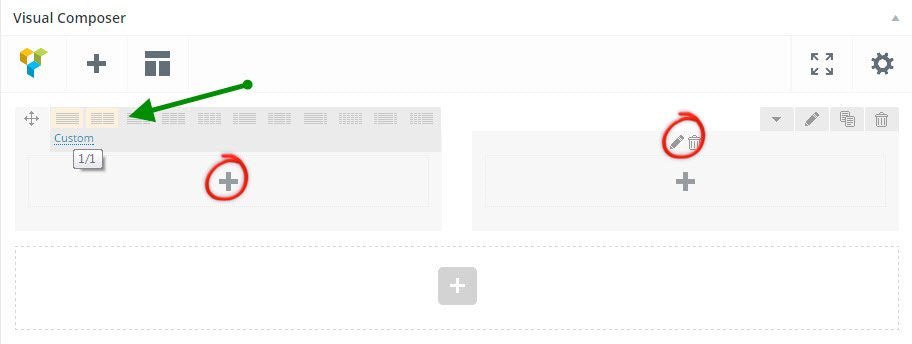
Step 4:The Add Element Popup appears, click on the first element in order to add a new Row to your page. A Row is a main building block of a page, you can split your Rows into Columns, place various elements into your rows, set Row Backgrounds, effects etc.

Step 5:Once you have the new Row added to your page you can split that Row into Columns in order to organize elements nicely in it. Once you split your Row into column you can start adding different Page Elements into your columns. If you want to edit your Row/Column Settings click on the small Pen icon (top right corner of the Row/Column). You can also Duplicate your Row with the Icon (duplicate icon) next to it or Remove the Row/Column with the icon to the right (trash bin icon).
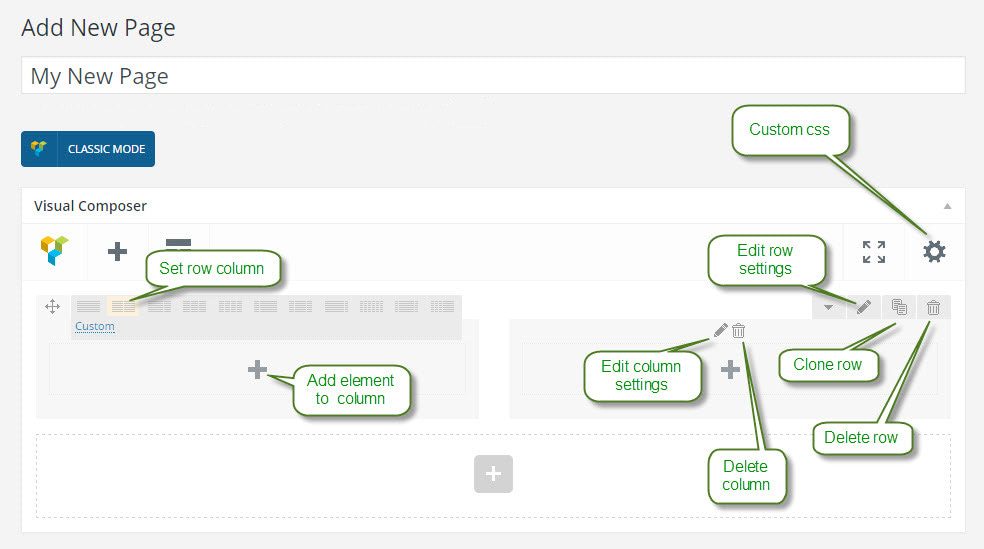
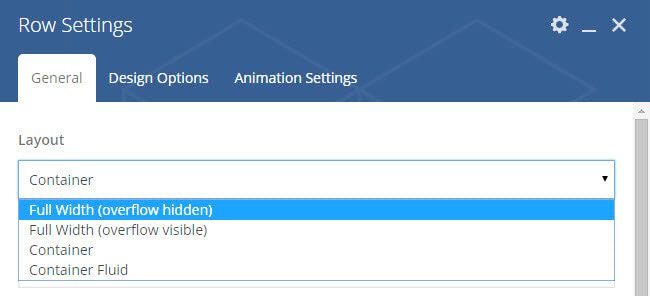
Click on the Edit Row button (Pen icon, top right of the Row). You will see the Row Settings Dialog popup.
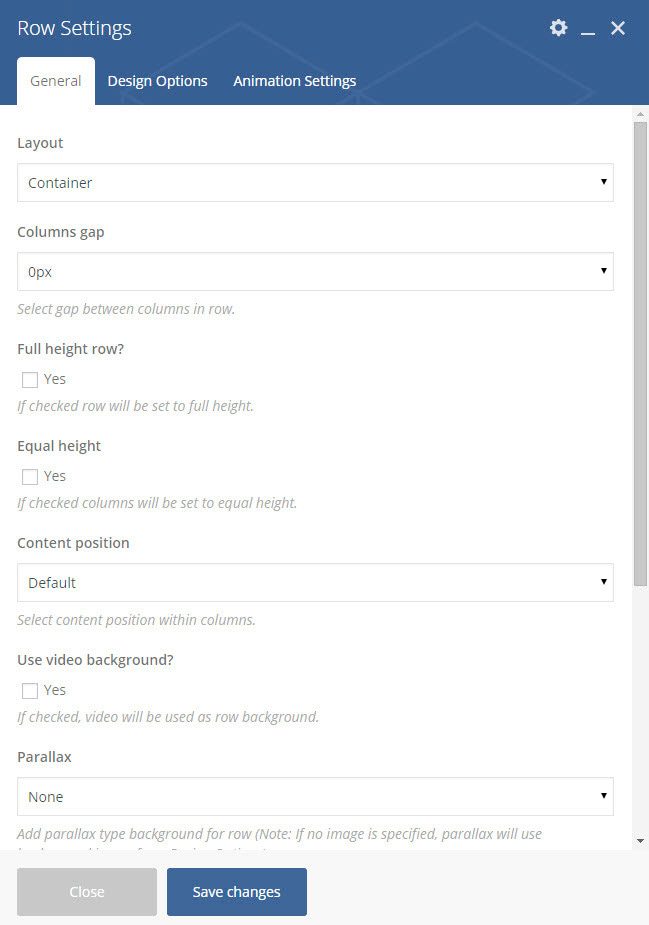
Layout:
Full Width (overflow hidden) - Row will full width (option default)
Full Width (overflow visible) - Row will full width, visible content if overflow
Container - Max width 1170px and center.
Container Fluid - Full width, padding left and padding right 15px.
Columns gap:
In order to control gaps between columns navigate to row parameter window and change column gap option - the gap will be introduced between all columns within this row. Default value of gap is set to 0.
Important: In case of mobile stacking gap will be introduced between stacked columns as well.
Full Height Row and Video Background:
Equal height:
In order to set columns within row to be equal height you must navigate to row parameter window and check Equal height option to be active. All columns within this row will have equal height and align to the longest column.
Content position:
In order to control vertical alignment of content within rows/columns navigate to row parameter window and select position of content - top, middle or bottom. By default value is set to "Default" meaning it will use Top or any other alternative if defined within your WP theme.
Parallax:
Row ID
Set ID of row (Note: make sure it is unique and valid according to w3c specification)
Once you have the desired number of columns in a Row you can manage each Column's individual settings by clicking on the Toolbar icons of that specific Column. The Plus Icon adds an element to the top of the Column, the bottom Plus Icon adds an elemnt to the bottom of the Column. The Trash Bin icon removes the Column. Access the Column Settings by clicking on the Pen Icon.
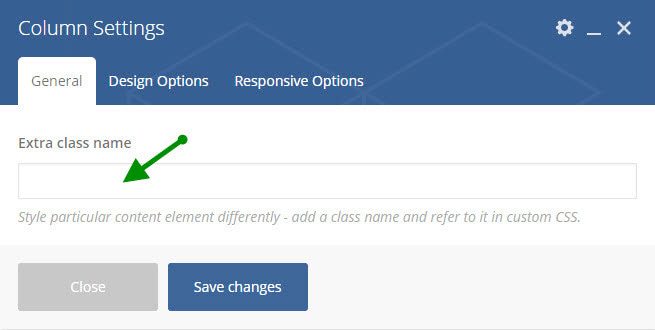
Access the Column Settings by clicking on the Pen Icon. The General tab provides with the option to add CSS classes to your Column if you wish to access it via CSS (can pass more than one divided by a space).
Adding Page Elements to your Page is pretty straightforward. First you need to have created a new page, added a Row to it and defined your Row Columns (read more in the previous section).
Step 1:Click on one of the Plus Icons within the column you want to add a new element to.
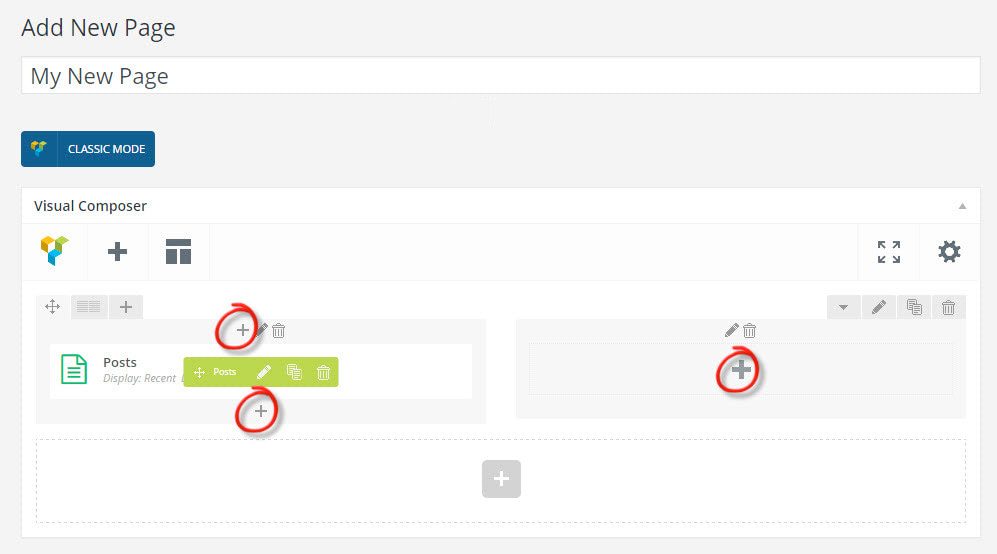
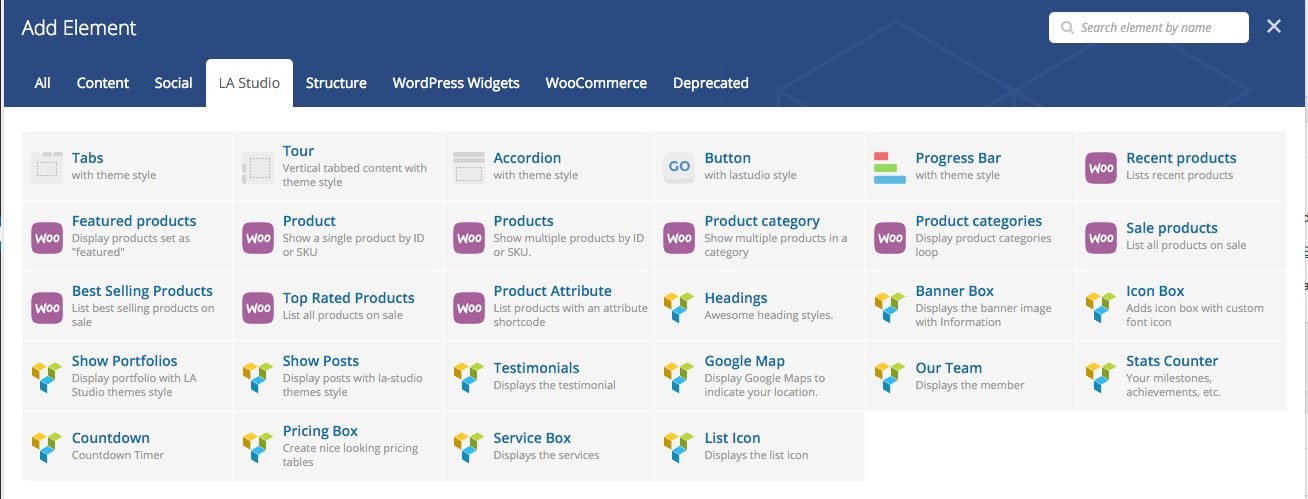
Step 2:The Page Elements dialog will appear, click on the element you want to add to your Column/Row.
Step 3:The Element Settings Dialog of the Element you are adding appears. Customize your element anyway you want, then click Save.

Step 4:Your element is now in the Column you added it to. Once you hover your newly added element you will see a small popup that let's you manage it. You can do the following with your elements:
Move - Drag your element via the Direction Icon to move it around within the Column,Row or Page.
Edit - Click on the Pen Icon to edit your Element's properties.
Clone - Click on the Copy Icon to duplicate your Element.
Delete - Click on the Trash Bin Icon to remove your Element.
![]()
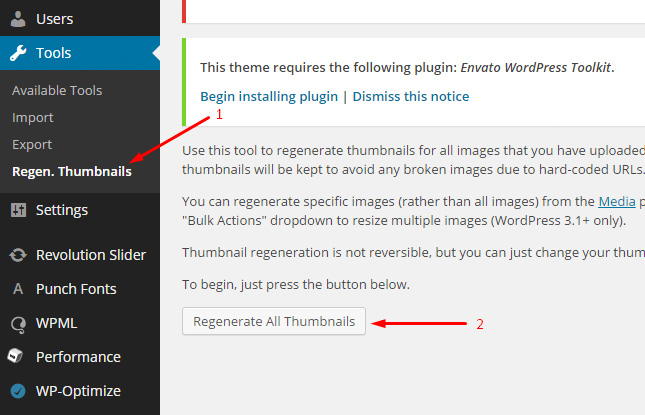
Install plugin http://wordpress.org/extend/plugins/regenerate-thumbnails/
If you have any questions that are beyond the scope of this documentation
Please feel free to us via HelpDesk https://wpelite.ticksy.com/.
Thanks so much!
Social Link
In this section you can control all social settings of your site